BlitzHome AP1 Air Purifier in Home Assistant Using Tasmota

Summary
Guide to seting up BlitzHome AP1 air purifier running Tasmota in Home Assistant with a blueprint and rules using MQTT autodiscovery.
All information applies only to Home Assistant 2022.8.0+ and Tasmota 12.1+
This guide assumes you’ve installed Tasmota on the BlitzHome AP1 and the Tasmota integration in Home Assistant.
Tasmota Configuration
Apply this template:
{"NAME":"BH-AP1","GPIO":[0,2272,0,2304,0,0,0,0,0,0,0,0,0,0],"FLAG":0,"BASE":54,"CMND":"TuyaMCU 11,0 | TuyaMCU 99,1 | Module 0"}
This will set the fnId’s and enable all rules.
Make sure this template is applied on a fresh Tasmota install. After a restart the webUI should not be showing any sensors or toggles.
Set the device name and topic to whatever you prefer, in my case I used:
DeviceName BlitzHome Air Purifier
Topic bh-ap1
Create a rule set that will forward received data from the Tuya MCU to their respective topics. Why those rules are used is explained at the end of the article.
backlog rule3
on tuyareceived#dptype1id1 do publish2 %topic%/powerstate %value% endon
on tuyareceived#dptype4id3 do publish %topic%/mode %value% endon
on tuyareceived#dptype2id2 do publish %topic%/pm25 %value% endon
on tuyareceived#dptype2id5 do publish %topic%/filterlife %value% endon
on tuyareceived#dptype4id19 do publish %topic%/countdown %value% endon
on tuyareceived#dptype4id22 do publish %topic%/airquality %value% endon
on event#sleep do tuyasend4 3,0 endon
on event#auto do tuyasend4 3,1 endon
on event#manual do tuyasend4 3,2 endon
on tuyareceived#dptype4id4 do backlog var1 %value%; add1 1; event sendfanspeed endon
on tuyareceived#dptype1id1=0 do publish %topic%/fanspeed 0 endon
on event#sendfanspeed do publish %topic%/fanspeed %var1% endon
; rule3 1
If you change the topic structure in the rules, the blueprint won’t work correctly without adjusting the topic structure in blueprint’s yaml.
Add Device to Home Assistant
Make sure the device is discovered in Home Assistant under Tasmota integration. If everything is configured correctly, Tasmota integration devices list should have your device (in my case named BlitzHome Air Purifier) which will have the following entities:
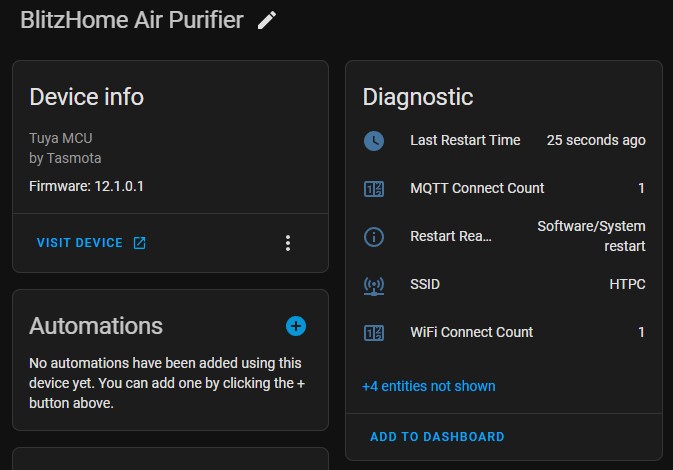
All the entities for sensors and power control will be added using the blueprint.
Autodiscovery Blueprint
Import the blueprint for the automation that will generate and publish all necessary MQTT discovery messages and link the entities to the device card for the air purifier.
Create an automation based on the imported blueprint. Use the Device dropdown to find your air purifier by device name, then type in the topic you configured (in my case bh-ap1)
The created automation will run on every Home Assistant restart and when the device reports to the MQTT broker it’s online. You can run it manually with “RUN ACTIONS” option.
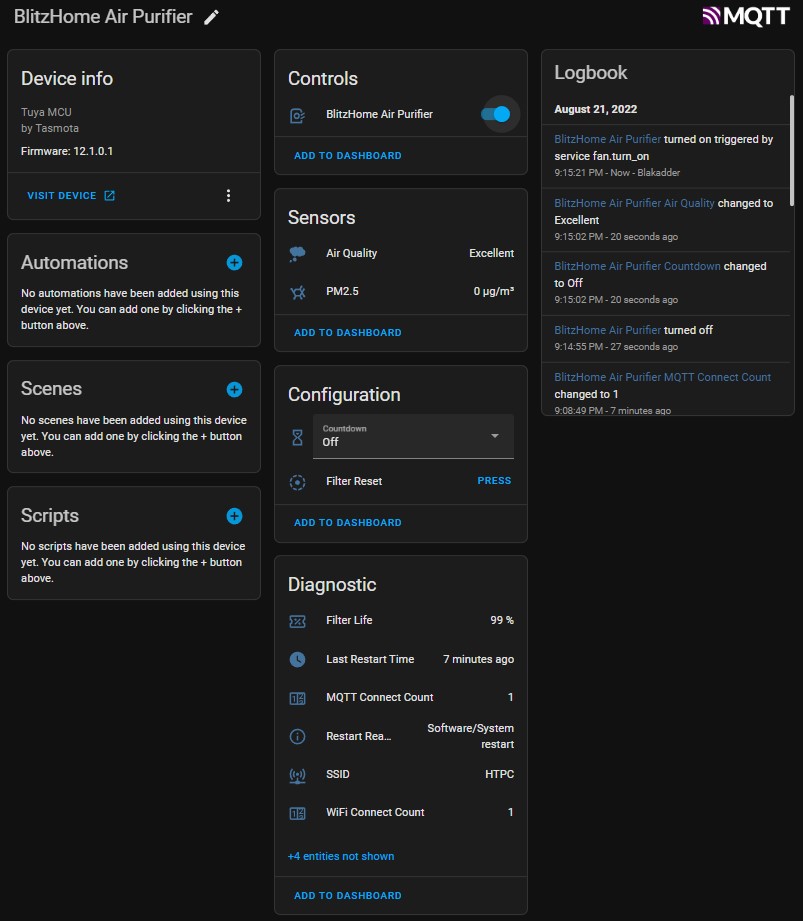
Resulting Device Card should look like this:
And that’s all there is to it. You can manually change the name, icon or or entity_id for each entity.
Fan entity now supports both speeds and three working modes.
Removing the Device
If you want to delete the device, first make sure you remove or disable the discovery automation.
How It’s All Done
I’ll use this space to explain a few things done in this project if you want to apply them on a different device or change up things to your preference.
Rules
These rules just grab TuyaMCU values and send them to the topics used by Home Assistant.
  on tuyareceived#dptype1id1 do publish2 %topic%/powerstate %value% endon
  on tuyareceived#dptype4id3 do publish %topic%/mode %value% endon
  on tuyareceived#dptype2id2 do publish %topic%/pm25 %value% endon
  on tuyareceived#dptype2id5 do publish %topic%/filterlife %value% endon
  on tuyareceived#dptype4id19 do publish %topic%/countdown %value% endon
  on tuyareceived#dptype4id22 do publish %topic%/airquality %value% endon
These events are used by the fan entity to change purifier’s modes of operation. It is possible to solve this with a more complicated command_value: template in the entity discovery payload but simpler is better.
        on event#sleep do tuyasend4 3,0 endon
        on event#auto do tuyasend4 3,1 endon
        on event#manual do tuyasend4 3,2 endon
Since the fan speed is reported from TuyaMCU to Tasmota as 0 and 1, but Home Assistant expects a 0 fan speed to be off this par of the rule helps in achieving that.
on tuyareceived#dptype4id4 do backlog var1 %value%; add1 1; event sendfanspeed endon
A fan speed report is written to Var1 then increased by 1. Then an event “sendfanspeed” is called.
on event#sendfanspeed do publish %topic%/fanspeed %var1% endon
On said even the Home Assistant correct fan speed value is published to the topic
on tuyareceived#dptype1id1=0 do publish %topic%/fanspeed 0 endon
To take care of the off value, whenever the purifier fan is turned off it will also send a 0 value to /fanspeed topic so the entity value will be properly updated. If this is not done, when the purifier is off the fan speed state would sometimes linger on the last speed.
Fan Entity Discovery
Source code for the blueprint is hosted on GitHub.
I write all my entity configurations in YAML first then convert it to JSON to create the MQTT discovery payload and use it in the blueprint. MAC address is randomized to protect the innocent.
name: "BlitzHome Air Purifier"
icon: "hass:air-purifier"
state_topic: "bh-ap1/powerstate"
state_value_template: "{{ value | int }}"
command_topic: "cmnd/bh-ap1/tuyasend1"
command_template: "1,{{ value }}"
payload_on: 1
payload_off: 0
percentage_state_topic: "bh-ap1/fanspeed"
percentage_value_template: "{{ value | int }}"
percentage_command_topic: "cmnd/bh-ap1/backlog0"
percentage_command_template: "{% if value == 0 %}tuyasend 1,0{% else %}tuyasend4 4,{{ value - 1 }}{% endif %}"
preset_modes:
  - "Sleep"
  - "Auto"
  - "Manual"
speed_range_max: 2
preset_mode_state_topic: "bh-ap1/mode"
preset_mode_value_template: "{%- set val = { '0':'Sleep', '1':'Auto', '2':'Manual' } -%}{{ val[value] | default('', true) }}"
preset_mode_command_topic: "cmnd/bh-ap1/event"
vailability_topic: "tele/bh-ap1/LWT"
payload_available: "Online"
payload_not_available: "Offline"
unique_id: '4C0AA6B42506_airpurifier'
device:
  cns [[mac,'4C0AA6B42506']]
Let’s touch on some choices made here:
command_topic: "cmnd/bh-ap1/tuyasend1"
command_template: "1,{{ value }}"
payload_on: 1
payload_off: 0
Since there’s no POWER toggle, the command TuyaSend1 is used to control the power state of the purifier. The payload required is 1,x therefore a template is used to create the necessary structure. 0 and 1 are defined as power payloads.
In conclusion HA will send 0 when the purifier is turned off, the command template will add 1, in front of it, it’ll take the new payload of 1,0 and send it to cmnd/bh-ap1/tuyasend1 topic which will turn the purifier off in Tasmota.
percentage_command_topic: "cmnd/bh-ap1/backlog0"
percentage_command_template: "{% if value == 0 %}tuyasend 1,0{% else %}tuyasend4 4,{{ value - 1 }}{% endif %}"
The speed command topic is Backlog0 because we need to use different TuyaSend commands depending on the situation.
When speed is set to 0 in Home Assistant purifier needs to be turned off using the same command as explained above. When speed is set to 1 or 2 in HA we use TuyaSend4 to dpId 4, but, since the values in Tasmota are 0 and 1, we subtract 1 from the HA value, therefore setting speed to 1 in HA will send cmnd/bh-ap1/backlog0 TuyaSend4 4,0 to Tasmota.
preset_modes:
  - "Sleep"
  - "Auto"
  - "Manual"
preset_mode_command_topic: "cmnd/bh-ap1/event"
Remember those rules involving events? This is why they exist. Because of those rules when you change mode in Home Assistant, the mode text is sent as an Event commands to Tasmota triggering one of the three rules and changing to the selected mode.
If we didn’t create the rules we’d have to make a preset mode command template like preset_mode_value_template:.
Button Entity
name: "BH-AP1 Filter Reset"
icon: mdi:image-filter-tilt-shift
command_topic: 'cmnd/bh-ap1/tuyasend1'
payload_press: "11,1"
entity_category: "config"
availability_topic: "tele/bh-ap1/LWT"
payload_available: "Online"
payload_not_available: "Offline"
unique_id: '4C0AA6B42506_filterreset'
device:
  cns: [[mac,'4C0AA6B42506']]
Configuration for an MQTT button entity is extremely simple. On a PRESS action in Home Assistant, a TuyaSend1 11,1 command is send to Tasmota. Since this button be used rarely, entity_category: config is used so the entity doesn’t mix with the control entities that will be used more often.
Air Quality Text Sensor Entity
name: "BH-AP1 Air Quality"
icon: mdi:thought-bubble
state_topic: 'bh-ap1/airquality'
value_template: "{%- set val = { '0':'Excellent', '1':'Good', '2':'Poor' } -%}{{ val[value] | default('', true) }}"
availability_topic: "tele/bh-ap1/LWT"
payload_available: "Online"
payload_not_available: "Offline"
unique_id: '4C0AA6B42506_airquality'
device:
  cns: [[mac,'4C0AA6B42506']]
Tasmota sends numeric values to the /airquality topic. To make it human readable in Home Assistant this template is used:
First we map the numeric values to text descriptions with {%- set val = { '0':'Excellent', '1':'Good', '2':'Poor' }.
Then we use the received numeric value which gets replaced with the mapped text value using {{ val[value] | default('', true) }}. | default('', true) makes sure that when the received value isn’t one the the mapped ones it will use nothing.
I hope this will help you learn more about the vast possibilities of using templates and different Tasmota commands for better integration with Home Assistant. If you have any questions about this catch me on Tasmota and Home Assistant Discord!



Comments