Dryer Notifications with Home Assistant GUI only
Summary
Dryer notifications using Tasmota with Home Assistant autodiscovery and automation triggers plus an energy cost calculation sensor and dryer state sensor.
For all this to work you need at least Tasmota 8.3 and Home Assistant 0.109
For this project I’m using the Franken IW101 power monitoring built in previous article. It goes without saying, you can use any power monitoring device.
Setting Up Tasmota
Device has its MQTT topic set to dryer. It doesn’t matter anymore for HA autodiscovery but I got into a habit on changing it since it’s easier to find when debugging MQTT.
To make HA autodiscovery easier you have to set up DeviceName and FriendlyName1:
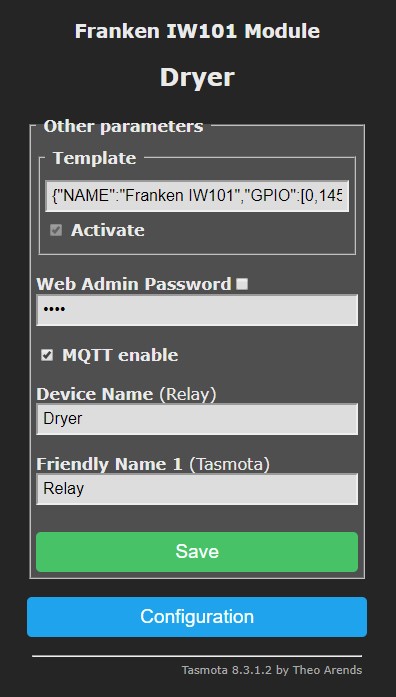
If you don’t want to click around the webUI, set all that with an easy Backlog Topic dryer; DeviceName Dryer; FriendlyName1 Relay.
Set PowerOnState 4 to avoid accidentally turning of the relay and shutting down the dryer.
Turn on PowerDelta 5 which configures Tasmota to report any change in power consumed (W) larger than 5% using MQTT. This feature helps in having timely readings of changes in consumed power in Home Assistant.
You may have noticed that, contrary to some guides, TelePeriod remains at default 300 seconds. That is because, in this case, we’re using PowerDelta to send frequent power updates only when power measurement is needed.
You can also add more precision to power measurements by using WattRes 3 which will increase precision by 3 decimals and you can do the same for VoltRes, FreqRes and AmpRes if you wish. In my case three decimals of Power resolution is the only option I used.
Final step is to turn autodiscovery on with So19 1 in console. Following the issued command you should see a stream of MQTT messages that are configuring your device in Home Assistant. Let’s flip to …
Setting up Home Assistant
Since we’ve done most of the work in Tasmota, the Configure - Integrations - MQTT card will display a new device named Dryer. Clicking on it will take you to the device page:
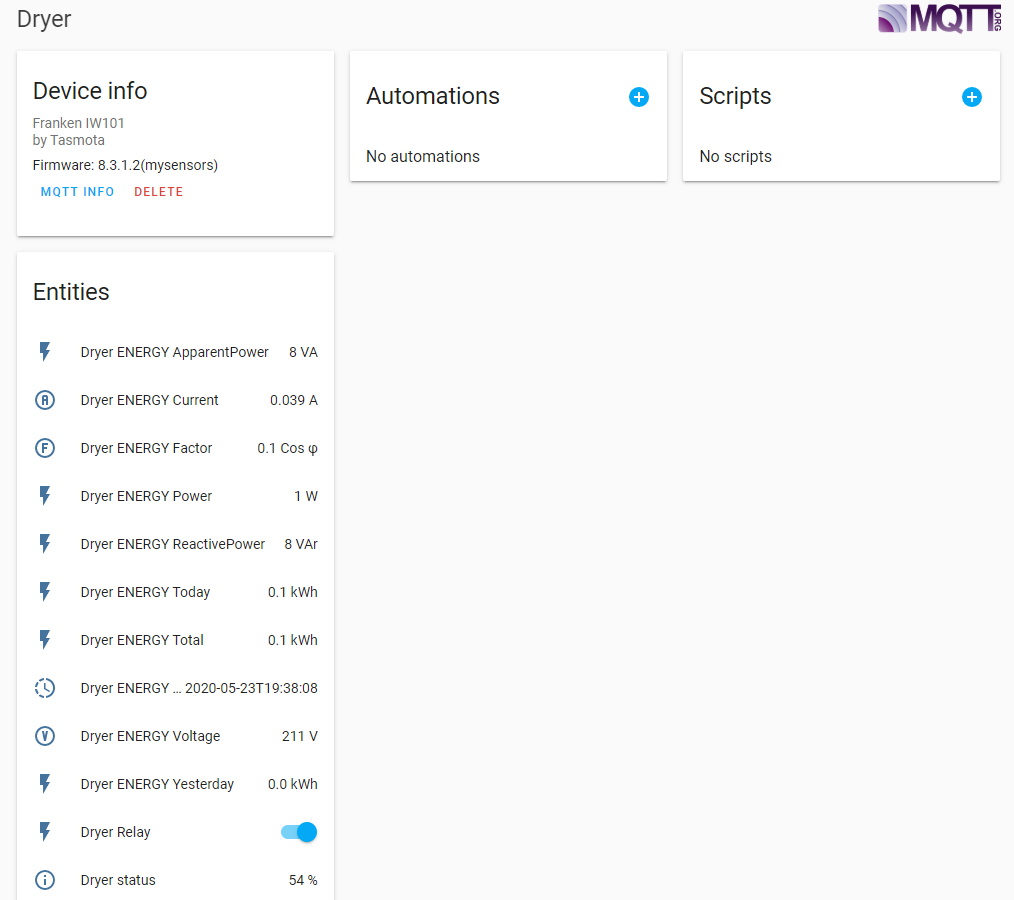
As you can see every entity begins with “Dryer” which is the DeviceName we configured in Tasmota. All sensor entities are named automatically using sensor names from the MQTT message. Only exception being the “Dryer Relay” entity which got the Relay part of the name from FriendlyName1 we also configured in Tasmota.
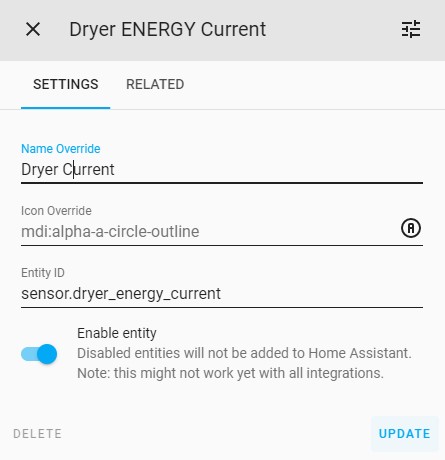
You can always change the name, icon or entity_id by clicking on that entity and editing desired field(s).
Everything is added in HA. Now for some …
Notification Automations
To get notifications on your preferred notification device you need to create an automation.
You should observe your machine’s operation and note the power consumption levels while drying and when its finished. You will use those values in automations.
Click on the “+” sign next to Automations and you’ll be offered a selection of possible automations:

Choose “Do something when… Dryer ENERGY Power power changes”. Complete the automation as follows:
Dryer Finished Automation
Name
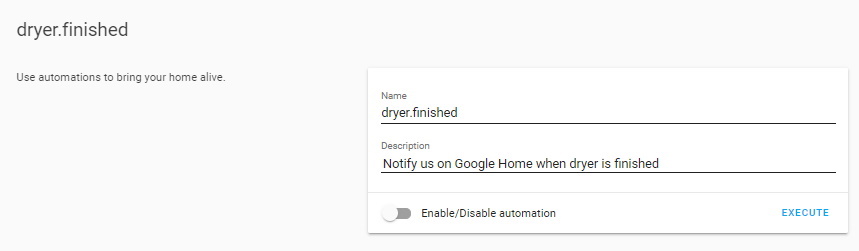
Set automation name and description. Toggle the automation to disabled, it will be important later.
Triggers

This automation will trigger whenever consumed power drops below 10W and stays below for 1 minute.
Change the values according to your dryer’s power consumption when its in idle.
Conditions
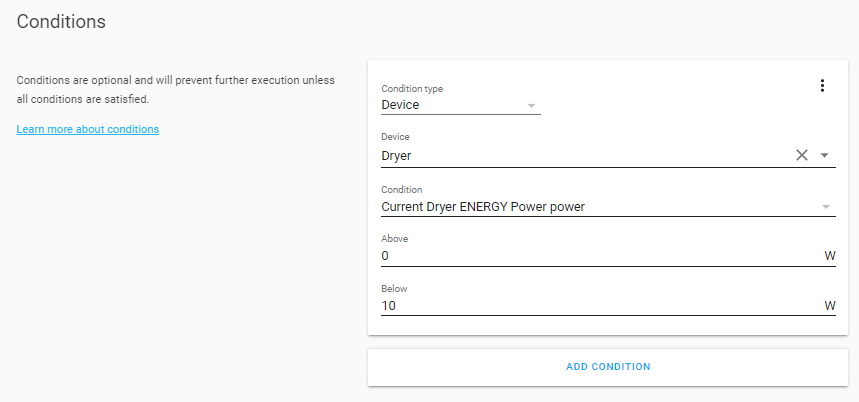
On every trigger it will check if the power consumption is still below the chosen threshold.
Actions
If the triggers and conditions are true, automation will proceed to notify us over Google Home (entity_id: media_player.google_display).
Don’t forget to change the entity for the text-to-speech service to your media player!
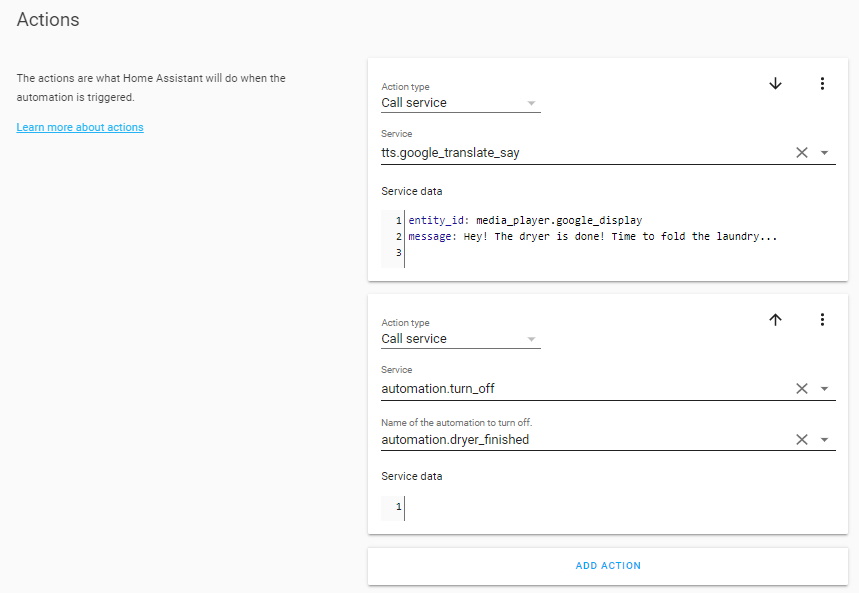
Once that is done the automation will turn itself off to prevent multiple triggers.
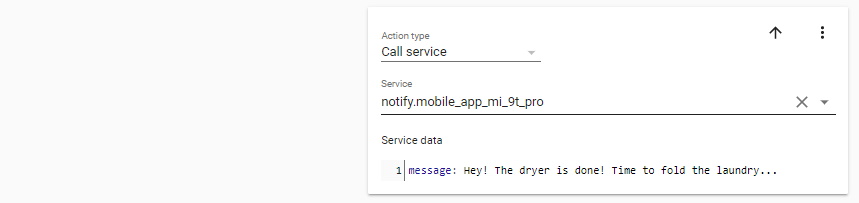
Other Notifications
You can set up any notify target instead or in conjunction with TTS. In this example a message is sent to Home Assistant Android App on my phone.
To make sure this automation won’t falsely trigger it needs to be disabled until the dryer has started drying which is done with the next automation:
Dryer Started Automation
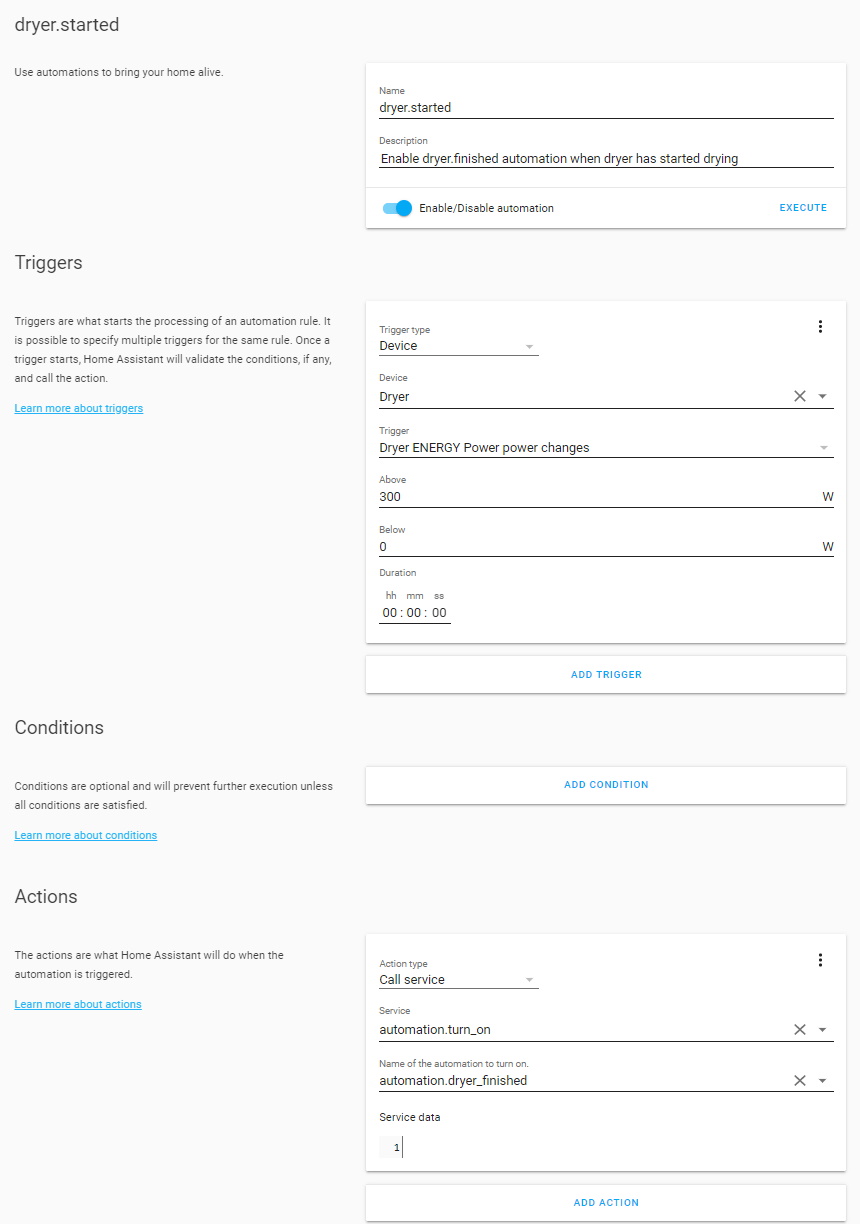
Again, adjust the power change trigger to your dryer values. In this case it will trigger as soon as used power is over 300W and will enable the “dryer.finished” rule.
Extra Sensors
This requires configuration.yaml editing. It’s extra work and HA has to be restarted for it to work but you’re rewarded with a Energy Cost sensors in your currency and a Dryer State sensor.
Energy Costs Calculator
Since all the power monitoring sensors are neatly autodiscovered we will create a template sensor that will use “ENERGY Power” readings and turn them into Dryer State.
sensors:
  - platform: template
    sensors:
      dryer_energy_today_cost:
        friendly_name: Dryer Energy Cost for Today
        value_template: >-
          {% if is_state('sensor.dryer_energy_today', 'unknown') %}
            Unknown
          {% else %}
            {{ '{:.2f}'.format(states('sensor.dryer_energy_today')  | multiply(1.0475)) }}
          {% endif %}
        unit_of_measurement: "€"
        icon_template: mdi:cash-multiple
      dryer_energy_yesterday_cost:
        friendly_name: Dryer Energy Cost for Yesterday
        value_template: >-
          {% if is_state('sensor.dryer_energy_yesterday', 'unknown') %}
            Unknown
          {% else %}
            {{ '{:.2f}'.format(states('sensor.dryer_energy_yesterday') | int | multiply(1.0475)) }}
          {% endif %}
        unit_of_measurement: "€"
        icon_template: mdi:cash-multiple
      dryer_energy_total_cost:
        friendly_name: Dryer Energy Cost Total
        value_template: >-
          {% if is_state('sensor.dryer_energy_total', 'unknown') %}
            Unknown
          {% else %}
            {{ '{:.2f}'.format(states('sensor.dryer_energy_total')  | multiply(1.0475)) }}
          {% endif %}
        unit_of_measurement: "€"
        icon_template: mdi:cash-multiple
Change “1.0475” to your electricity price per kWh to calculate energy costs. Change unit of measurement to your needs.
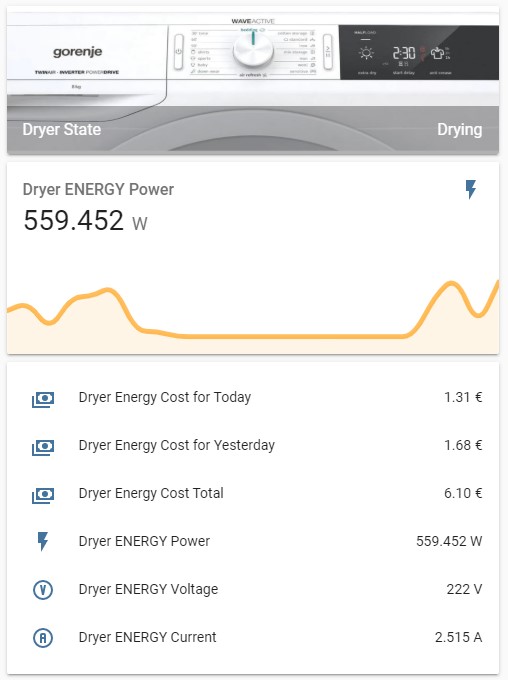
Dryer State
This is a basic state sensor for the dryer showing “Drying” or “Idle” depending on power consumption. There’s no finesse about it, when it uses more than 200W power it’ll show Drying, otherwise it’ll show “Off”.
sensors:
  - platform: template
    sensors:
      dryer_state:
        friendly_name: "Dryer State"
        value_template: >-
          {% if states('sensor.dryer_energy_power') | float > 200 %}
            Drying
          {%- else %}
            Off
          {%- endif %}
        icon_template: >-
          {% if states('sensor.dryer_energy_power') | float > 200 %}
            mdi:tumble-dryer
          {%- else -%}
            mdi:tumble-dryer-off
          {%- endif %}
Dryer with Multiple States
If your dryer has different modes you will need to monitor power consumption for each mode over a few days to determine values for each mode.
In my case drying consumes more than 300W, anti crease mode fluctuates between 4W and 160W and dryer uses around 1W when idle.
According to those numbers the following sensor is created with templated conditions for each mode and one more for “Unknown” when data is, well, unknown.
sensors:
  - platform: template
    sensors:
      dryer_state:
        friendly_name: "Dryer State"
        value_template: >-
          {% if states('sensor.dryer_energy_power') | float > 200 %}
            Drying
          {% elif states('sensor.dryer_energy_power') | float >= 4 %}
            Anti Crease
          {% elif states('sensor.dryer_energy_power') | float > 1 < 4 %}
            Idle
          {% elif states('sensor.dryer_energy_power') | float <= 1 %}
            Off
          {%- else %}
            Unknown
          {%- endif %}
        icon_template: >-
          {% if states('sensor.dryer_energy_power') | float > 200 %}
            mdi:tumble-dryer
          {% elif states('sensor.dryer_energy_power') | float >= 4 %}
            mdi:tumble-dryer-alert
          {%- else -%}
            mdi:tumble-dryer-off
          {%- endif %}
The icon is templated to differentiate between Drying, Anti Crease and Idle/Off
Lovelace Card Example

Explore more like this

Moes ES1 (ZSS-LP-HP02) Zigbee Human Presence Sensor Review
It was hard to resist the new Moes labelled sensor on AliExpress because it looked identical to the Linptech ES1 sensor which works with Xiaomi’s Mijia ecosystem but I avoided...
Comments