Tasmota Motion Sensor in Home Assistant Using Tasmota Integration

Summary
The definitive (?) guide to setting up a PIR in Tasmota and adding it to Home Assistant using a Tasmota integration discovery. No configuration.yaml editing required!
All information applies only to Home Assistant 2020.12.0 and Tasmota 9.2+
You’ve connected a PIR sensor to your device and gone through instructions to set it up. Now you’re left with custom topics and grappling with Home Assistant’s configuration.yaml and even after all that it doesn’t show up under the Device card in Home Assistant and you want the nifty Device triggers to use in automations. Let’s fix all that!
First, delete everything you did and start again!
Initial Setup
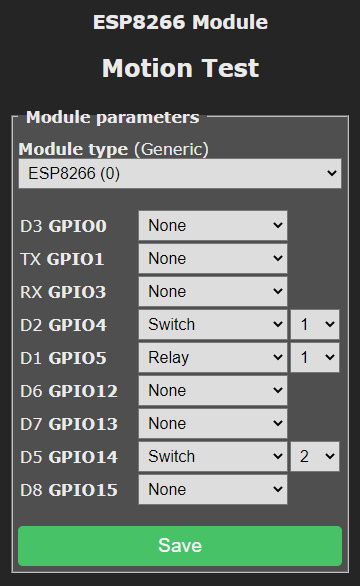
Example device is setup as follows: MQTT topic is set to motion_test, DeviceName is “Motion Test” and FriendlyName1 is “Relay”. Relay1 and Switch1 are on the device, newly connected PIR sensor is configured as Switch2.
Decouple PIR and Relay
By default the PIR sensor will trigger Relay1. Yes, even though it is Switch2 or if it were higher number. To prevent it from controlling the relay, or decouple them we will use a rule.
rule1 on switch2#state=1 do publish stat/%topic%/MOTION ON endon
This will publish a message on switch state ON (1) to the topic defined (%topic% will be replaced with the actual device topic).
By default switches send only TOGGLE states (2). We will change that with SwitchMode2 14 to ON (1) only. The OFF message is not needed and will be handled inside Home Assistant instead.
After all that you will have output like this in the console when the PIR triggers:
20:37:42 RUL: SWITCH2#STATE performs "publish stat/motion_test/MOTION ON"
20:37:42 MQT: stat/motion_test/MOTION = ON
Add Device to Home Assistant
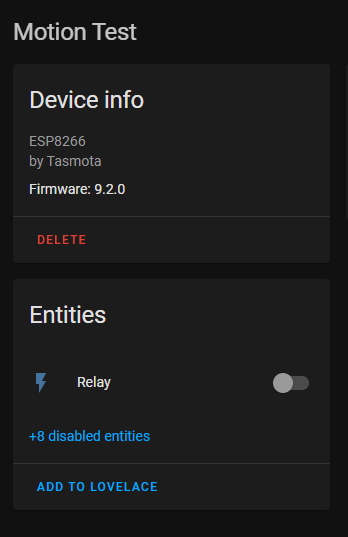
Make sure the device is discovered in Home Assistant under Tasmota integration. If everything is configured correctly, Home Assistant’s Configuration - Devices list should have a new device: “Motion Test”
Backlog Shortcut
You can do all of the above with just a single Backlog line:
Backlog rule1 on switch2#state=1 do publish stat/%topic%/MOTION ON endon; rule1 1; switchmode2 14
Setup Manual Discovery
To add the PIR sensor to Home Assistant as a binary sensor we have to create a discovery configuration message.
This is that message written in yaml so it is easier to view and edit. Most of the configuration does not need to be changed and will be automatically populated when sent from a rule in Tasmota.
name: Motion Sensor
state_topic: stat/%topic%/MOTION
device_class: motion
force_update: true
off_delay: 30
availability_topic: tele/%topic%/LWT
payload_available: Online
payload_not_available: Offline
unique_id: '%macaddr%_motion'
device:
  connections: [[mac,'%macaddr%']]
Discovery Configuration Analysis
name: Motion Sensor
Change it to a name you’d like displayed in Home Assistant. It will also determine the initial entity_id, in this case binary_sensor.motion_sensor.
device_class: motion
This determines how Home Assistant displays the device in Lovelace.
state_topic: stat/%topic%/MOTION
this is the same as the topic defined in the PIR decoupling rule. Change only if you’ve changed the rule topic.
force_update: true
When true it will retrigger the binary sensor in HA even if the state is same. Very useful for a motion sensor.
off_delay: 30
This is the magic ingredient! Here you can define a delay period after which Home Assistant will set the motion sensor state to off. Specially useful if you’re using PIR sensors that switch to off after only a few seconds.
availability_topic: tele/%topic%/LWT
payload_available: Online
payload_not_available: Offline
Standard sensor availability configuration. Do not change.
unique_id: '%macaddr%_motion'
device:
  connections: [[mac,'%macaddr%']]
These are the important discovery bits. Thanks to the %macaddr% rule variable these will be populated automatically with the needed device identifier.
device: value will link the new PIR sensor to the existing device in HA Devices list. Do not change!
You can change unique_id but there’s no reason to do so unless you have multiple motion sensors on the same device.
YAML to JSON
Take the yaml block and convert it to JSON. I recommend using onlineyamltools. Make sure to set Output indent size to 0.
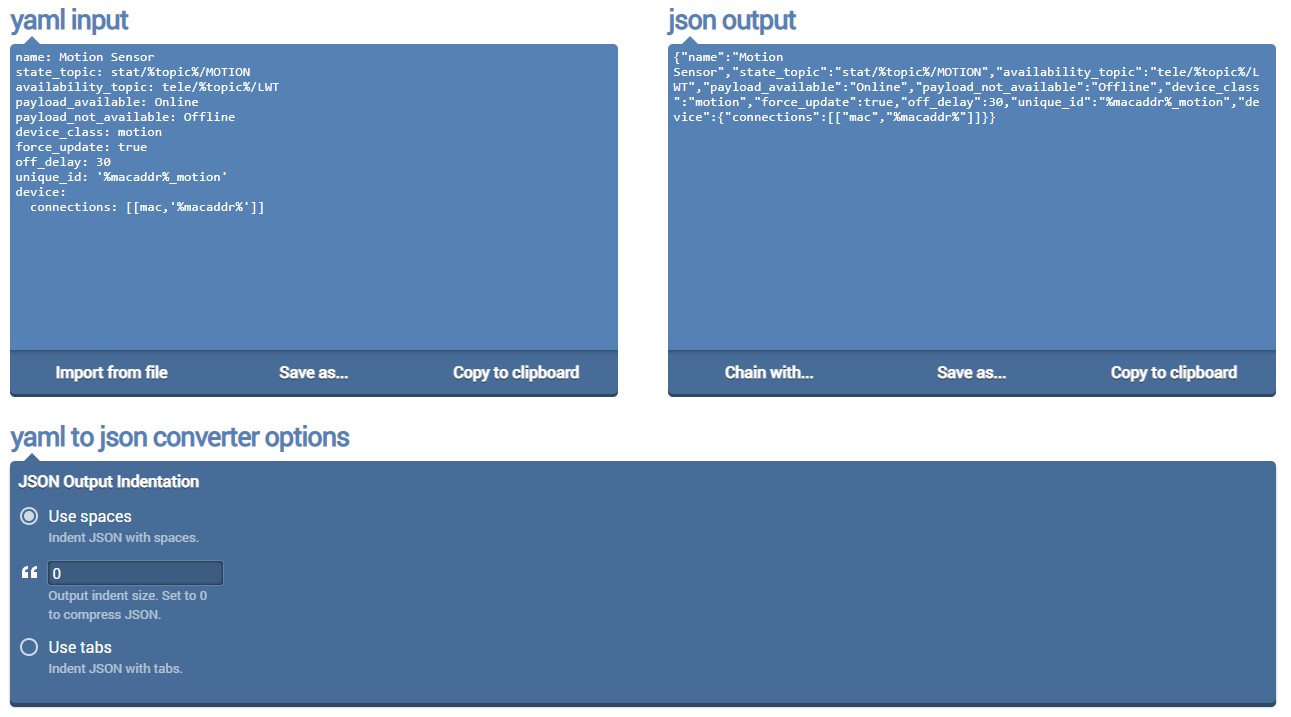
Copy the json output to clipboard.
Rule to Trigger Discovery
In Tasmota we will add a new rule that will send a discovery message on Tasmota startup.
rule2 on system#boot do publish2 homeassistant/binary_sensor/%macaddr%_motion/config <paste json output here> endon
Publish2 will send a retained message to topic homeassistant/binary_sensor/%macaddr%_motion/config with the payload that was created and converted to JSON:
{"name":"Motion Sensor","state_topic":"stat/%topic%/MOTION","availability_topic":"tele/%topic%/LWT","payload_available":"Online","payload_not_available":"Offline","device_class":"motion","force_update":true,"off_delay":30,"unique_id":"%macaddr%_motion","device":{"connections":[["mac","%macaddr%"]]}}
Enable the rule with Rule2 1.
Enjoy
Once Tasmota is restarted (Restart 1), the discovery configuration message will be sent.
21:34:11 RUL: SYSTEM#BOOT performs "publish2 homeassistant/binary_sensor/650124819AA2_motion/config {"name":"Kitchen Motion","state_topic":"stat/kitchen-multisensor/MOTION","availability_topic":"tele/kitchen-multisensor/LWT","payload_available":"Online","payload_not_available":"Offline","device_class":"motion","force_update":true,"off_delay":30,"unique_id":"650124819AA2_motion","device":{"connections":[["mac","650124819AA2"]]}}"
21:34:11 MQT: homeassistant/binary_sensor/650124819AA2_motion/config = {"name":"Kitchen Motion","state_topic":"stat/kitchen-multisensor/MOTION","availability_topic":"tele/kitchen-multisensor/LWT","payload_available":"Online","payload_not_available":"Offline","device_class":"motion","force_update":true,"off_delay":30,"unique_id":"650124819AA2_motion","device":{"connections":[["mac","650124819AA2"]]}} (retained)
A new entity will pop up in Home Assistant under the same device.
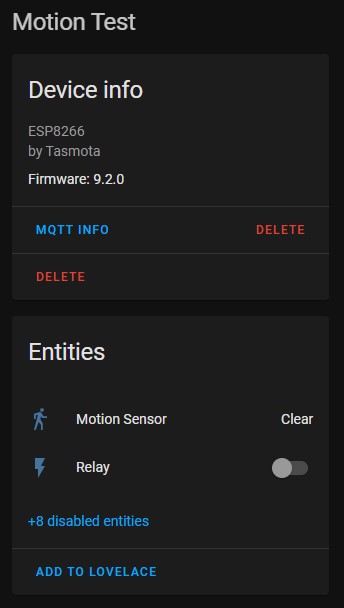
You can use the new Device Triggers in automations instead of entity_id.

If you open MQTT INFO window you will find the discovery configuration payload you’ve created.

Remove the Device
Simply send an empty retained MQTT message to the configuration topic shown in MQTT INFO.
Easiest way is from Tasmota using publish2 command. For this example it would be publish2 homeassistant/binary_sensor/650124819AA2_motion/config.
And don’t forget to delete or disable the rule publishing the discovery message.

Explore more like this

Moes ES1 (ZSS-LP-HP02) Zigbee Human Presence Sensor Review
It was hard to resist the new Moes labelled sensor on AliExpress because it looked identical to the Linptech ES1 sensor which works with Xiaomi’s Mijia ecosystem but I avoided...
Comments