ProfiCook Tuya Water Kettle in Home Assistant Using Tasmota
Summary
Guide to setting up ProfiCook PC-WKS 1167 G water kettle running Tasmota in Home Assistant with a blueprint and rules using MQTT autodiscovery.
All information applies only to Home Assistant 2022.8.0+ and Tasmota 12.1+
I’ve had this Kettle for a couple of years now, still works great! Since Home Assistant changed the way MQTT is configured in YAML it was the final push to convince me to switch from the old manual method to my favorite custom discovery method.
This guide assumes you’ve installed Tasmota on the ProfiCook PC-WKS 1167 G and the Tasmota integration in Home Assistant.
Tasmota Configuration
Apply this template:
{"NAME":"ProfiCook PC-WKS 1167 G","GPIO":[0,2272,0,2304,0,0,0,0,0,0,0,0,0,0],"FLAG":0,"BASE":54,"CMND":"TuyaMCU 99,1 | TuyaMCU 71,105 | TuyaMCU 72,102 | TempRes 0 | Module 0"}
This will set the fnId’s to display kettle temperature and target temperature as sensors in Home Assistant.
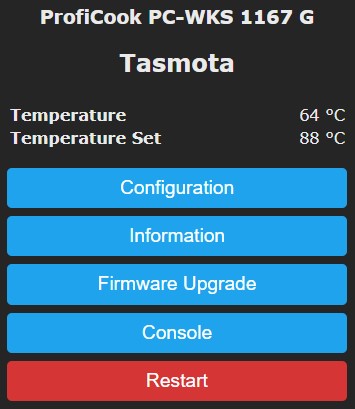
Make sure this template is applied on a fresh Tasmota install (if not reset the configuration with Reset 4). After a restart the webUI should look something like this:
Set the device name and topic to whatever you prefer, in my case I used:
DeviceName Kettle
Topic kettle
Create a rule set that will forward received data from the Tuya MCU to their respective topics. Why those rules are used is explained at the end of the article.
rule3
on tuyareceived#dptype4id101 do publish %topic%/mode %value% endon
on tuyareceived#dptype2id102 do publish %topic%/tempset %value% endon
on tuyareceived#dptype5id104 do publish %topic%/error %value% endon
on tuyareceived#dptype4id106 do publish %topic%/status %value% endon
on tuyareceived#dptype2id107 do publish %topic%/timer %value% endon
on tuyareceived#dptype4id106==2 do backlog delay 3; publish %topic%/timer 0 endon
Activate the rule with Rule3 1.
If you change the topic structure in the rules, the blueprint won’t work correctly without adjusting the topic structure in blueprint’s yaml.
Add Device to Home Assistant
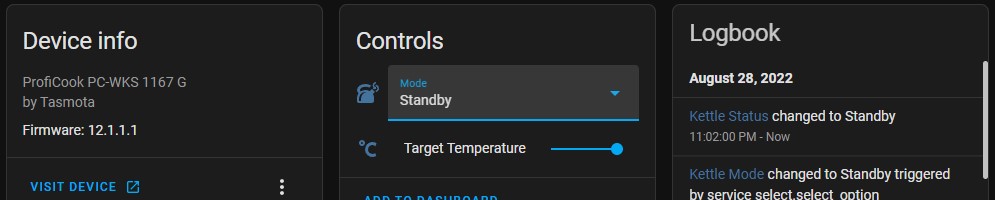
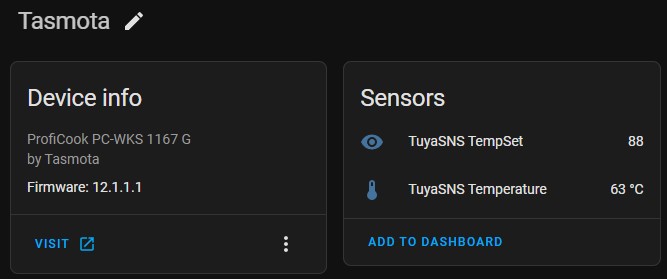
Make sure the device is discovered in Home Assistant under Tasmota integration. If everything is configured correctly, Tasmota integration devices list should have your device (in my case named simply Kettle) which will have the following entities:
All the entities for control will be added using the blueprint.
Autodiscovery Blueprint

Import the blueprint for the automation that will generate and publish all necessary MQTT discovery messages and link the entities to the device card.
Create an automation based on the imported blueprint. Use the Device dropdown to find your kettle by device name, then type in the topic you configured (in my case kettle)

The created automation will run on every Home Assistant restart and when the device reports to the MQTT broker it’s online. You can run it manually with “RUN ACTIONS” option.
Resulting Device Card should look like this:
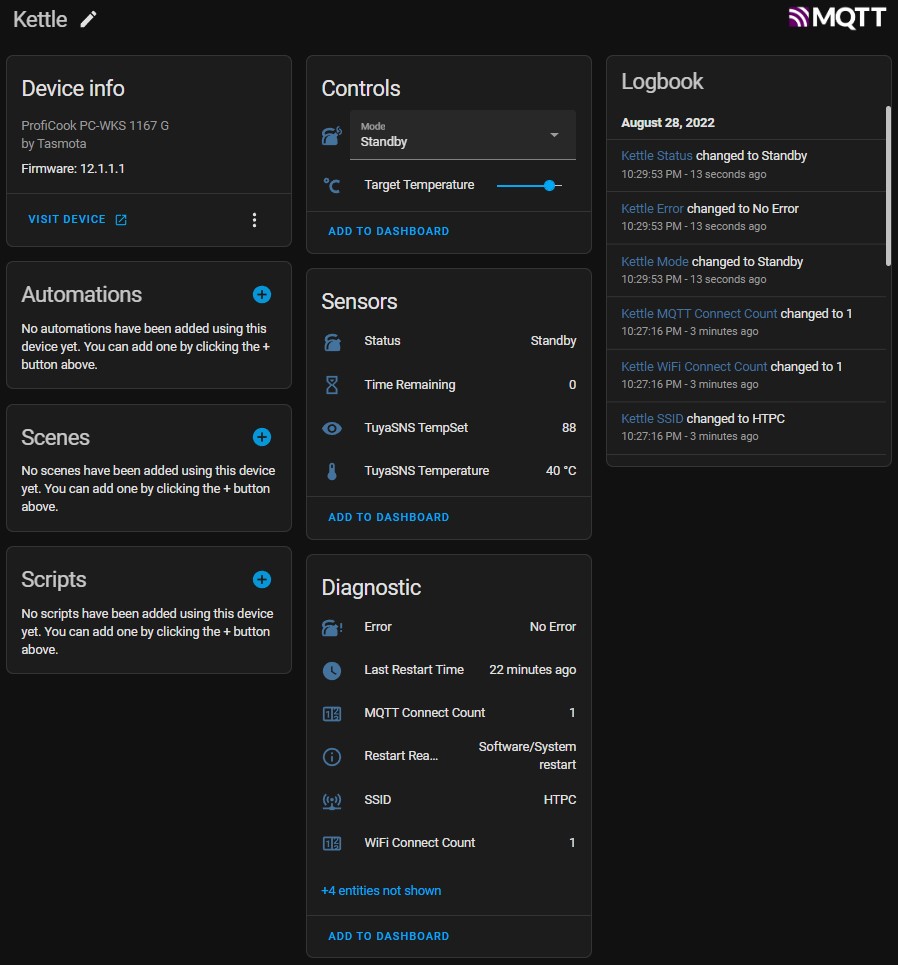
You can manually change the name, icon or or entity_id for each entity.
Removing the Device
If you want to delete the device, first make sure you remove or disable the discovery automation.
How It’s All Done
I’ll use this space to explain a few things done in this project if you want to apply them on a different device or change up things to your preference.
Rules
These rules just grab TuyaMCU values and send them to the topics used by Home Assistant.
on tuyareceived#dptype4id101 do publish %topic%/mode %value% endon
on tuyareceived#dptype2id102 do publish %topic%/tempset %value% endon
on tuyareceived#dptype5id104 do publish %topic%/error %value% endon
on tuyareceived#dptype4id106 do publish %topic%/status %value% endon
on tuyareceived#dptype2id107 do publish %topic%/timer %value% endon
On the other hand, this line is used to “cheat” the time remaining sensor:
on tuyareceived#dptype4id106==2 do backlog delay 3; publish %topic%/timer 0 endon
By default, if you change modes the time remaining display will be stuck on the last value until you change modes again. This rule sets the /timer topic to 0 every time kettle’s status is changed to standby.
Mode Select Entity Discovery
Source code for the blueprint is hosted on GitHub.
I write all my entity configurations in YAML first then convert it to JSON to create the MQTT discovery payload and use it in the blueprint. MAC address is randomized to protect the innocent.
name: Kettle Mode
state_topic: "kettle/mode"
icon: 'hass:kettle-steam'
options:
  - "Standby"
  - "Custom °C"
  - "Quick Boil"
  - "100°C"
  - "85°C"
  - "60°C"
  - "45°C"
value_template: "{%- set val = { '0':'45°C', '1':'60°C', '2':'85°C', '3':'100°C', '4':'Quick Boil', '5':'Custom °C', '6':'Standby' } -%}{{ val[value] | default('', true) }}"
command_topic: cmnd/kettle/backlog0
command_template: >
    {%- set val = { '45°C':'0', '60°C':'1', '85°C':'2', '100°C':'3', 'Quick Boil':'4', 'Custom °C':'5', 'Standby':'6' } -%}
	  {% if states(expand(device_entities(device_id)) | selectattr('entity_id', 'search', '_status') | map(attribute='entity_id') | list | join( ',' )) != "Standby" %}
	  tuyasend4 101,6;
		{% endif %}
	  tuyasend4 101,{{ val[value] }}
json_attributes_topic: "kettle/status"
json_attributes_template: "status: {{ value_json }}"
availability_topic: "tele/kettle/LWT"
payload_available: "Online"
payload_not_available: "Offline"
unique_id: 'EF6B54C1841D_mode'
dev:
  cns: [[mac,'EF6B54C1841D']]
{% raw %}options:
  - "Standby"
  - "Custom °C"
  - "Quick Boil"
  - "100°C"
  - "85°C"
  - "60°C"
  - "45°C"
value_template: >
    {%- set val = { '0':'45°C', '1':'60°C', '2':'85°C', '3':'100°C', '4':'Quick Boil', '5':'Custom °C', '6':'Standby' } -%}
    {{ val[value] | default('Standby', true) }}
Since Tasmota sends numeric values of the active mode to the /mode topic you make it human readable in Home Assistant with the value_template field:
Map the numeric values to texts of options defined in options: with {%- set val = { '0':'45°C', '1':'60°C', '2':'85°C', '3':'100°C', '4':'Quick Boil', '5':'Custom °C', '6':'Standby' }.
Then use the received numeric value and it gets replaced with its text value using {{ val[value] }}. | default('Standby', true) just makes sure that when the received value isn’t one the the mapped ones (who knows what might happen) it will display “Standby” in Home Assistant. You can also make it | default('', true) which will leave the select entity empty
command_topic: cmnd/kettle/backlog0
command_template: >
    {%- set val = { '45°C':'0', '60°C':'1', '85°C':'2', '100°C':'3', 'Quick Boil':'4', 'Custom °C':'5', 'Standby':'6' } -%}
	  {% if states(expand(device_entities(device_id)) | selectattr('entity_id', 'search', '_status') | map(attribute='entity_id') | list | join( ',' )) != "Standby" %}
	  tuyasend4 101,6;
		{% endif %}
	  tuyasend4 101,{{ val[value] }}
Command topic here is Backlog0 because we might need to send more than one TuyaSend command.
Using the same principle as above but in reverse you map the text values to numeric values this time. Those values are used to build a payload 101,{{ val[value] }} which is then sent to Tasmota using TuyaSend4 command.
So what’s with all the other exotic things in here? Well, when the kettle is running in a mode, to switch to another working mode, you need to go to “Standby” first and this fixes it.
states(expand(device_entities(device_id)) | selectattr('entity_id', 'search', '_kettlestatus') | map(attribute='entity_id') | list | join( ',' ))
This filter will fetch all entities under the Kettle device, then filter out the entity containing _filterstatus which is the status sensor. It will compare the state of it and if it is not “Standby” it will first send TuyaSend4 101,6 to put the kettle in standby before sending the command to switch a mode. This way, using the selector will immediately switch modes instead of requiring you to manually select “Standby” then your desired mode. This took a while to figure out… #worthit!?
I hope this will help you learn more about the vast possibilities of using templates and different Tasmota commands for better integration with Home Assistant. If you have any questions about this catch me on Tasmota and Home Assistant Discord!

Explore more like this

Moes ES1 (ZSS-LP-HP02) Zigbee Human Presence Sensor Review
It was hard to resist the new Moes labelled sensor on AliExpress because it looked identical to the Linptech ES1 sensor which works with Xiaomi’s Mijia ecosystem but I avoided...

Comments