Tasmota Lights in Home Assistant Using Template Schema

Summary
The complex world of integrating Tasmota lights into Home Assistant using template schema.
This guide is outdated and a lot of the functions are deprecated. It’s still a good tool for learnining templating and using MQTT commands in Tasmota
Before proceeding, you should familiarize yourself with how lights are configured and work in Tasmota by reading at least the first part of the Tasmota Lights article.
There are three possible ways on integrating MQTT lights in Home Assistant which are called “schema” in their terminology. The common way is the “default” schema which is used in HA autodiscovery and documented for manual configuration, next is “json” schema which we’ll skip since it doesn’t work with Tasmota and there’s “template” schema which is the main topic.
While default schema is sufficient for average use, thus being the default choice, it has limitations.
Home Assistant has a transition attribute used when turning lights on or off which can define number of seconds the light should take to change states. Default MQTT Light does not have support for that.
While you could enable transitions directly in Tasmota using Fade and Speed commands, they would either be always on or always off and still not easily controllable with Home Assistant scenes and automations.
The way Tasmota is designed the use of White command to control the white channel will automatically turn off all RGB channels so there’s no way to have both turned on unless you use SetOption37.
Main advantage of “template schema” is that you can take any input from defined MQTT topics and reformat it using HA’s templating engine to appropriate values. That gives you a ton of flexibility in configurating your lights. Template schema supports all light features available in HA even transition and flash.
Basic Configuration
These are minimum required values that have to be defined for the template schema light to work light.
Change “light” to your device topic
- platform: mqtt
  schema: template
  command_topic: "cmnd/light/Backlog"
  command_on_template: "Power 1"
  command_off_template: "Power 0"
  state_topic: "tele/light/STATE"
  state_template: '{{ value_json.POWER | lower }}'
Platform is mqtt as usual but now we also define a new variable schema: template which instructs HA that we will use template schema.
command_topic
This variable defines the topic that will be used to send commands to your light. We use Backlog instead of Power because it offers flexibility when expanding the configuration with more features. For anything more than basic on/off functions you have to use Backlog.
command_on_template
Most important variable here, it defines what happens when light.turn_on service is invoked in Home Assistant. It will range from a simple ˙on` payload up to a complex template with multiple if..then statements to cover all possible service data attributes. It is the core of why using template schema is so flexible and powerful. We will revisit this variable often. And remember for later: order of if statements is very important.
command_off_template
Basically the off version of command_on template but with less possible data attributes from light.turn_off service. We will revisit this variable once or twice.
state_topic
Topic used to know whether the light is on or off. While Tasmota sends the response to Power command on stat/%topic%/RESULT using this topic would limit us when expanding features.
Instead issue Setoption59 1 in Tasmota and use topic tele/light/STATE which will contain all needed states and a some more.
For the topic to be useful you need to define state_template.
state_template
This template will extract the value of key ˙POWER` from the json payload received on defined state_topic.
Template schema light requires on or off as state values. Since Tasmota returns ON and OFF which is not the same. We use filter | lower to convert received values to acceptable lowercase on and off.
State response topic that will
Good to have variables
While not exactly required, these are nice to have. All these variables are identical to “default schema” light configuration.
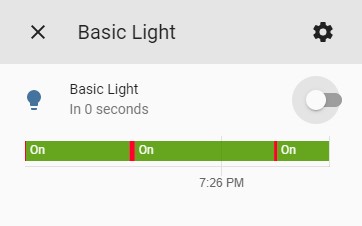
  name: 'Basic Light'
  availability_topic: 'tele/light/LWT'
  payload_available: 'Online'
  payload_not_available: 'Offline'
Name defines the name of your light and will be the basis for creating its entity_id (in this case it would be light.basic_light). Availability topic and payloads are defined so Home Assistant will show the light as offline if its disconnected from Wi-Fi or MQTT.
Complete configuration will look like this:
- platform: mqtt
  schema: template
  name: 'Basic Light'
  command_topic: 'cmnd/light/Backlog'
  command_on_template: 'Power 1'
  command_off_template: 'Power 0'
  state_topic: 'tele/light/STATE'
  state_template: '{{ value_json.POWER | lower }}'
  availability_topic: 'tele/light/LWT'
  payload_available: 'Online'
  payload_not_available: 'Offline'
Adding Dimming
Next step is adding Dimming function to the light. I would suggest setting SetOption20 1 to have independent control of brightness and power.
- platform: mqtt
schema: template
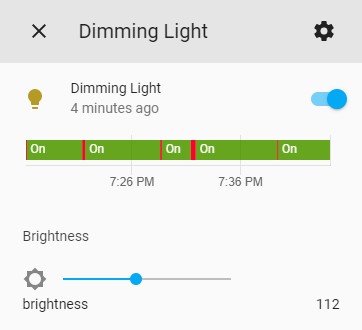
name: 'Dimming Light'
command_topic: 'cmnd/light/Backlog'
command_on_template: >-
{% if brightness is defined %}
Dimmer {{ (brightness / 2.55) | int }};
{% endif %}
{% if state is defined %}
Power 1;
{%- endif -%}
command_off_template: 'Power 0'
state_topic: 'tele/light/STATE'
state_template: '{{ value_json.POWER | lower }}'
availability_topic: 'tele/light/LWT'
payload_available: 'Online'
payload_not_available: 'Offline'
brightness_template: '{{ (value_json.Dimmer * 2.55) | int }}'
brightness_template
Extracts brightness state using Dimmer value from received mqtt json which is on a scale of 0-100 and multiplying it to convert to a 0-255 scale Home Assistant requires.
| int makes sure the value is passed as an integer.
command_on_template
Command on template has gotten a bit more complex. Since the command topic is the Backlog command we will simply add needed commands to the backlog.
Now it first checks if there’s a brightness variable defined from HA side, if that is true it adds Dimmer command with parameter of brightness value passed from HA divided by 2.55 to get it down to Tasmota acceptable range. If there’ a state change aka an on command is sent, it appends the Dimmer xx; with Power 1;.
In practice, when you move the brightness slider in Lovelace to 140 Tasmota will receive Backlog Dimmer 55;Power 1; command and set the light to Dimmer 55 followed by turning it on. If the light was already on Power 1 will do nothing.
Adding RGB
- platform: mqtt
schema: template
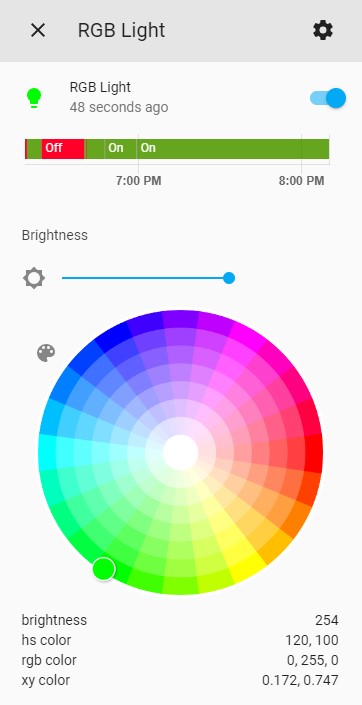
name: 'RGB Light'
command_topic: 'cmnd/light/Backlog'
command_on_template: >-
{%- if red is defined and green is defined and blue is defined -%}
Color2 {{ "%02X" | format(red | int) }}{{ "%02X" | format(green | int) }}{{ "%02X" | format(blue | int) }};
{%- endif -%}
{% if brightness is defined %}
Dimmer {{ (brightness / 2.55) | int }};
{% endif %}
{% if state is defined %}
Power 1;
{%- endif -%}
command_off_template: 'Power 0'
state_topic: 'tele/light/STATE'
state_template: '{{ value_json.POWER | lower }}'
availability_topic: 'tele/light/LWT'
payload_available: 'Online'
payload_not_available: 'Offline'
brightness_template: '{{ (value_json.Dimmer * 2.55) | int }}'
red_template: '{{ value_json.Color[0:2] | int(base=16) }}'
green_template: '{{ value_json.Color[2:4] | int(base=16) }}'
blue_template: '{{ value_json.Color[4:6] | int(base=16) }}'
command_on_template
Another clause is added which sends Color2 command to Tasmota if an RGB value is passed from HA. The template will convert received color values from int to hex.
red/green/blue_template
Extracts RGB state using Color values from received mqtt json. Received values are in hex and combined in a single string so we give instructions to get first two characters in string for red, characters between 2nd and 4th place for green and characters between 4th and 6th place for blue.
Next we convert hex to decimal with | int(base=16).
RGBW Lights
All this is about to get a lot more complex.
Since we have the limitation of Tasmota not allowing simultaneous control of White and RGB with white and Color commands we have to split the lights into two with SetOption37 128, but don’t worry, we’ll keep it all together.
Make sure all options are set correctly with Backlog so37 128; so20 0; rgbwwtable 255,255,255,255,255; so59 1; so17 0.
- platform: mqtt
schema: template
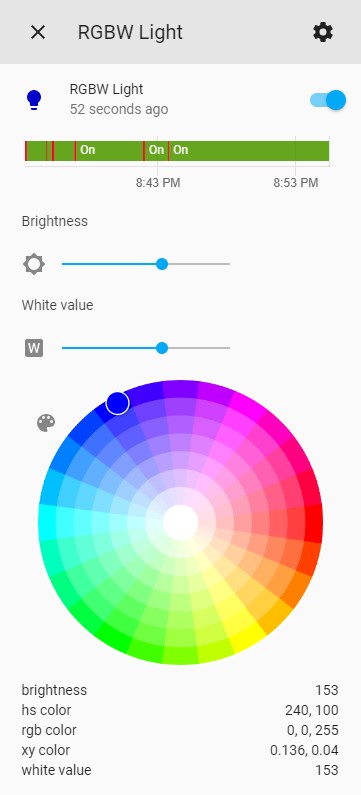
name: "RGBW Light"
command_topic: "cmnd/light/Backlog"
command_on_template: >-
{%- if state is defined -%}
Power0 1;
{%- endif -%}
{%- if brightness is defined -%}
Dimmer1 {{ (brightness / 2.55) | int }};
{%- endif -%}
{%- if red is defined and green is defined and blue is defined -%}
Color2 {{ "%02X" | format(red | int) }}{{ "%02X" | format(green | int) }}{{ "%02X" | format(blue | int) }}=;
{%- endif -%}
{%- if white_value is defined -%}
White {{ (white_value / 2.55) | int }};
{%- endif -%}
State
command_off_template: "Power0 0; State"
state_topic: "tele/light/STATE"
state_template: '{% if value_json.POWER1 == "ON" or value_json.POWER2 == "ON" %}on{% else %}off{% endif %}'
brightness_template: '{{ (value_json.Dimmer1 * 2.55) | int }}'
red_template: '{{ value_json.Color[0:2] | int(base=16) }}'
green_template: '{{ value_json.Color[2:4] | int(base=16) }}'
blue_template: '{{ value_json.Color[4:6] | int(base=16) }}'
white_value_template: '{{ (value_json.White * 2.55) | int }}'
payload_available: "Online"
payload_not_available: "Offline"
command_on_template
Power on command has changed to Power0 1. This is because we have two separate lights with Power1 and Power2. Power0 sends the same command to all existing Power
There’s an additional statement for White channel control, as always converted to 0-255 range from Tasmota’s 0-100. Since we split the lights into two, controlling White in this case will not turn off RGB.
There’s one tiny detail of huge importance that shouldn’t be missed.
Notice the = at the end of Color2 command? When a Color command is issued with it, it tells Tasmota to change only the RGB values and keep the White value the same as it was before the command. This allows to change RGB colors without turning off white.
Lastly there a State commands at the end. This is because Power0 doesn’t trigger sending state to tele/%topic%/STATE topic so we have to request it manually at the end.
command_off_template
Also replaced Power with Power0 for same reasons and added State command at the end.
state_template
Two power outputs mean we need some extra logic to determine if the light is on or off so we template the folowing:
If RGB (Power1) or White (Power2) light are ON, set light state to on else set it to off
brightness_template
Brightness is changed from Dimmer to Dimmer1 which is the RGB light brightness. Brightness controls will also control only the RGB light, white channel is controlled through White command which is basically just adjusting white channel brightness.
RGBCCT Lights
We will not build on the RGBW light configuration but will instead use the RGB Light one as a starting point.
Make sure all these options are set correctly: Backlog so37 0; so20 0; rgbwwtable 255,255,255,255,255; so59 1; so17 0
- platform: mqtt
  schema: template
  name: 'RGBCCT Light'
  command_topic: 'cmnd/light/Backlog'
  command_on_template: >-
      {% if brightness is defined %}
      Dimmer {{ (brightness / 2.55) | int }};
      {% endif %}
      {%- if red is defined and green is defined and blue is defined -%}
      Color2 {{ "%02X" | format(red | int) }}{{ "%02X" | format(green | int) }}{{ "%02X" | format(blue | int) }};
      {%- endif -%}
      {% if state is defined %}
      Power 1;
      {% endif %}
      {%- if color_temp is defined -%}
      CT {{ color_temp }};
      {%- endif -%}
  command_off_template: 'Power 0'
  state_topic: 'tele/light/STATE'
  state_template: '{{ value_json.POWER | lower }}'
  availability_topic: 'tele/light/LWT'
  payload_available: 'Online'
  payload_not_available: 'Offline'
  brightness_template: '{{ (value_json.Dimmer * 2.55) | int }}'
  red_template: '{{ value_json.Color[0:2] | int(base=16) }}'
  green_template: '{{ value_json.Color[2:4] | int(base=16) }}'
  blue_template: '{{ value_json.Color[4:6] | int(base=16) }}'
  color_temp_template: '{{ value_json.CT }}'
  max_mireds: 500
  min_mireds: 153
command_on_template
Another clause is added which sends CT command to Tasmota if a color temperature value is passed from HA.
You could use the = trick in Color2 commands like in RGBW Light to keep CT on when RGB light is turned on. Only issue is that setting CT will always turn off RGB and there’s no simple way to circumvent that.
color_temp_template
Extracts color temperature state using CT value from received mqtt json. Since it uses the common mired scale no conversion is necessary.
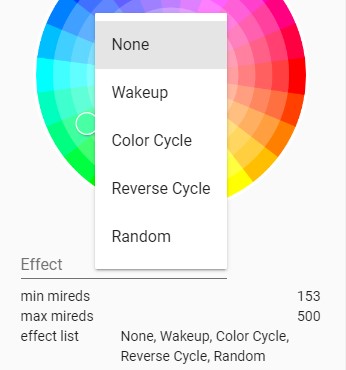
max_mireds and min_mireds
These variables make sure HA doesn’t try to send CT values outside of Tasmota range which is 153 to 500.
Configuring 5 channel lights using template schema offers no real benefits compared to default schema.
Adding effects
If you want to add the few built in Tasmota effects (and only 0 and 1 for dimmable and CT lights) and have them displayed nicely instead of numbers.
  command_on_template: >-
      # insert appropriate statements for your light before this
      {% if effect is defined %}
      Scheme {% if effect == "None" %}0{% elif effect == "Wakeup" %}1{% elif effect == "Color Cycle" %}2{% elif effect == "Reverse Cycle" %}3{% elif effect == "Random" %}4{% endif %};
      {% endif %}
  effect_list:
    - "None"
    - "Wakeup"
    - "Color Cycle"
    - "Reverse Cycle"
    - "Random"
  effect_template: >-
    {% if value_json.Scheme == 0 %}
    None
    {% elif value_json.Scheme == 1 %}
    Wakeup
    {% elif value_json.Scheme == 2 %}
    Color Cycle
    {% elif value_json.Scheme == 3 %}
    Reverse Cycle
    {% elif value_json.Scheme == 4 %}
    Random
    {% endif %}
command_on_template
This clause send Scheme X depending on the selected effect from the dropdown
effect_list
List of available effects for the drop down menu. Make sure the names are the same across all three variables.
effect_template
Extracts current running effect from Scheme from received mqtt json and changes the numbers into readable effect names.
Adding transitions
In Home Assistant transitions are declared in seconds which is the time the light would take to change states. While Tasmota has transitions in the form of Fade and Speed, that function isn’t identical to Home Assistant transitions. Tasmota Fade simply enables or disables fading or transitioning while Speed controls how long the fade takes. Each speed unit is time in 0.5s to fade from 0 to 100%. The problem arises when the starting value is larger. For example, Speed 4 takes 2.0s to fade from full brightness to black but 0.5s to move from 75% to 100%.
Another issue is that Tasmota caps the speed value at 40 which would be 20 second to go from off to full brightness.
This will mean that some transitions will be shorter than desired and all transition longer than 20 seconds will still be only 20 seconds.
  command_on_template: >-
      {%- if transition is defined -%}
      Speed {% if transition < 21 %}{{ transition * 2 }}{% else %}40{% endif %}; Fade 1;
      {%- endif -%}
      # ...insert statements to control your light
      {%- if transition is defined -%}
      Delay {% if transition < 21 %}{{ transition * 11 }}{% else %}210{% endif %}; Fade 0;
      {%- endif -%}
  command_off_template: "{% if transition is defined %}Speed {{ transition * 2 }}; Fade 1; Power 0; Delay {% if transition < 21 %}{{ transition * 11 }}{% else %}210{% endif %}; Fade 0{%- else -%}Power 0{%- endif -%}"
command_on_template
To have transitions working properly we need to add two statements in the command_on_template.
The first one defines the speed of the transition. First it checks if the transition is shorter than 20 seconds. If that’s the case it multiplies it by two to get the Speed parameter. If the value is larger than 20 it passed the max Speed value of 40. Then it enables Fade
After that light commands would be executed and then the second transition statement comes into play.
Second line first issues a Delay in duration of the transition value +10% to be sure the fade has completed. After that it disables Fade on the device.
One issue with this is that if you issue another command during the Delay time, the Fade state might remain enabled but in practice it should not pose a problem since transitions are usually used as part of scene transitions.
command_off_template
Likewise we need to add clause in case of power off with transition to do the same. Set Speed, enable Fade, execute Power off then delay until transition is ended and disable Fade.
Adding flash
Home Assistant has a flash feature with values “short” and “long”. Tasmota doesn’t have exactly the same one but there are multiple ways to emulate it
Using Blink
Blink or Power 3 combined with BlinkTime and BlinkCount to adjust duration and “blinkiness”.
  command_on_template: >-
      {%- if flash is defined -%}
        {% if flash == "short" %}BlinkTime 5; BlinkCount 15; Power 3{% else %}BlinkTime 10; BlinkCount 15; Power 3{% endif %};
      {% else %}
      # ... add other clauses here
      {%- endif -%}
This requires the if flash statement to be the first and then you have to nest all other if statements under else clause. That is done because if we didn’t nest everything else in the blink command (Power 3) would be interrupted by Power 1 at the end of the statement.
BlinkTime 5 is 0.5 seconds between blinks and with blink count of 15 gives exactly 15 seconds duration. With BlinkTime doubled the duration doubles to 30 seconds. You can adjust these values however you wish.
Using Rules
Another way to get the lights flashing is to use a Rule which toggles Power repeatedly on a defined Delay
Rule1 ON Power#State DO Backlog Delay 5; Power 2 ENDON ON Rules#Timer=1 DO Backlog Rule1 0; Delay5; Power 0 ENDON
  command_on_template: >-
      {%- if flash is defined -%}
      Rule1 1; Ruletimer1 {% if flash == "short" %}15{% else %}30{% endif %};
      {%- endif -%}
On flash defined it enables Rule1 and starts a timer with duration of 15s for short or 30s for long flash. During the timer duration the rule repeatedly toggles the light. Once the timer runs out the second part of the rule executes disabling the rule and turning the light off.
Complete Configuration in Action
To finish this longwinded explanation here’s my RGBW light using everything explained above.
- platform: mqtt
  # Backlog so37 127; so20 0; rgbwwtable 255,255,255,255,255; so59 1; so17 1
  # transition can be 20 max, Tasmota doesn't support more than 40
  schema: template
  name: "Split H801 RGBW"
  command_topic: "cmnd/light/Backlog"
  command_on_template: >-
      {%- if flash is defined -%}
        {% if flash == "short" %}Blinktime 5; Blinkcount 15; Power 3{% else %}Blinktime 10; Blinkcount 15; Power 3{% endif %};
      {% else %}
        {%- if transition is defined -%}
        Speed {% if transition < 21 %}{{ transition * 2 }}{% else %}40{% endif %}; Fade 1;
        {%- endif -%}
        {%- if state is defined -%}
        Power0 1;
        {%- endif -%}
        {%- if brightness is defined -%}
        Dimmer1 {{ (brightness / 2.55) | int }};
        {%- endif -%}
        {%- if red is defined and green is defined and blue is defined -%}
        Color2 {{ "%02X" | format(red | int) }}{{ "%02X" | format(green | int) }}{{ "%02X" | format(blue | int) }}=;
        {%- endif -%}
        {%- if white_value is defined -%}
        White {{ (white_value / 2.55) | int }};
        {%- endif -%}
        {%- if effect is defined -%}
        Scheme {% if effect == "None" %}0{% elif effect == "Wakeup" %}1{% elif effect == "Color Cycle" %}2{% elif effect == "Reverse Cycle" %}3{% elif effect == "Random" %}4{% endif %};
        {%- endif -%}
        {%- if transition is defined -%}
        Delay {% if transition < 21 %}{{ transition * 11 }}{% else %}210{% endif %}; Fade 0; Speed 0
        {%- endif -%}
        State
      {%- endif -%}
  command_off_template: "{% if transition is defined %}Speed {{ transition * 2 }}; Fade 1; Power0 0; Delay {% if transition < 21 %}{{ transition * 11 }}{% else %}210{% endif %}; Fade 0; Speed 0; {%- else -%}Power0 0{%- endif -%}; State"
  state_topic: "tele/light/STATE"
  effect_list:
    - "None"
    - "Wakeup"
    - "Color Cycle"
    - "Reverse Cycle"
    - "Random"
  effect_template: >-
    {% if value_json.Scheme == 0 %}
    None
    {% elif value_json.Scheme == 1 %}
    Wakeup
    {% elif value_json.Scheme == 2 %}
    Color Cycle
    {% elif value_json.Scheme == 3 %}
    Reverse Cycle
    {% elif value_json.Scheme == 4 %}
    Random
    {% endif %}
  state_template: '{% if value_json.POWER1 == "ON" or value_json.POWER2 == "ON" %}on{% else %}off{% endif %}'
  brightness_template: '{{ (value_json.Dimmer1 * 2.55) | int }}'
  red_template: '{{ value_json.Color[0:2] | int(base=16) }}'
  green_template: '{{ value_json.Color[2:4] | int(base=16) }}'
  blue_template: '{{ value_json.Color[4:6] | int(base=16) }}'
  white_value_template: '{{ (value_json.White * 2.55) | int }}'
  json_attributes_topic: "tele/light/STATE"
  json_attributes_template: '{{ value_json.Wifi | tojson }}'
  payload_available: "Online"
  payload_not_available: "Offline"
json_attributes
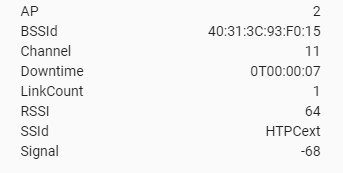
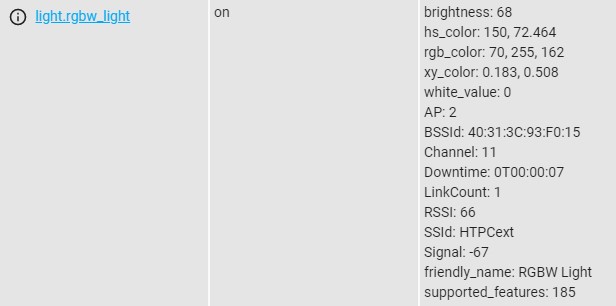
One last tip for the end. You can define a json_attributes topic and value template. This will take the defined key from the json and add its value to the light attributes.
In this case we choose the Wifi key which needs to be reformatted as json with | tojson.
This will take the following values
{..."Wifi":{"AP":2,"SSId":"HTPCext","BSSId":"40:31:3C:93:F0:15","Channel":11,"RSSI":66,"Signal":-67,"LinkCount":1,"Downtime":"0T00:00:07"}}
and display them in the light’s card and in states tab
In Conclusion
As you can see, you can do almost anything using template schema and only a few topics thanks to Backlog. You can go even deeper with nested if statements and/or multiple clauses, using states of other entities in Home Assistant, using Events, you name it.

Explore more like this

Moes ES1 (ZSS-LP-HP02) Zigbee Human Presence Sensor Review
It was hard to resist the new Moes labelled sensor on AliExpress because it looked identical to the Linptech ES1 sensor which works with Xiaomi’s Mijia ecosystem but I avoided...


Comments