Tuya Heater using Tasmota and Home Assistant Climate Entities

Summary
Guide to seting up a Tuya based heater running Tasmota in Home Assistant as a climate entity
All information applies only to Home Assistant 2021.04.0+ and Tasmota 9.4+
This guide assumes you’ve correctly set up Tasmota on your Tuya heater device and the Tasmota integration in Home Assistant as well as knowledge of TuyaMCU related terminology (fnId, dpId, Enums, TuyaSend, etc).
Tasmota device used in this guide was a Bornholm heater and was configured like this:
Backlog Topic heater; DeviceName Heater; FriendlyName1 Heater Power
- dpId1 mapped to Power1 used to turn the heater on or off (
TuyaMCU 11,1) - dpId2 mapped to Tuya Set Temperature sensor (
TuyaMCU 72,2) - dpId3 mapped to Tuya Temperature sensor (
TuyaMCU 71,3) - dpId4 mapped to Tuya Enum1 and it controls heat level (high, low) (
TuyaMCU 61,4thenTuyaEnumList 1,1)
Output of TuyaMCU command:
{"TuyaMCU":[{"fnId":11,"dpId":1},{"fnId":72,"dpId":2},{"fnId":71,"dpId":3},{"fnId":61,"dpId":4}]}
Add Device to Home Assistant
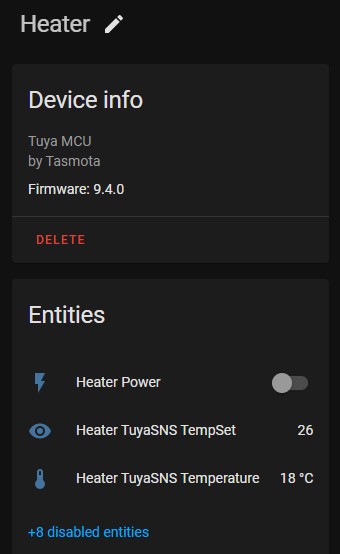
Make sure the Tasmota device is discovered in Home Assistant under Tasmota integration. If everything is configured correctly, Home Assistant’s Configuration - Devices list should have a device “Heater” and will show only the default hidden entities.
Generic Thermostat Integration
Add a simple generic thermostat using the discovered entities by editing configuration.yaml. This type of integration doesn’t support heating modes controllable with dpId4.
Add to configuration.yaml:
climate:
  - platform: generic_thermostat
    name: Heater
    heater: switch.heater_power
    target_sensor: sensor.heater_tuyasns_temperature
    min_temp: 18
    max_temp: 28
    target_temp: 25
    initial_hvac_mode: "off"
    precision: 1.0
Configuration Analysis
name: Heater
Self explanatory! Name of the device and entity. Change as you wish.
heater: switch.heater_power
This is the switch entity that is used to turn the heater on/off. You can find out (or change) the entity name by clicking on it in the Device Card page.
target_sensor: sensor.heater_tuyasns_temperature
You can use any temperature sensor entity in HA, does not have to be the built in one.
If you’re using the heater’s sensor make sure to use the reporting temperature sensor which displays the temperature unit in HA and not the set temperature one.
    min_temp: 18
    max_temp: 28
    target_temp: 25
min_temp and max_temp set the minimum and maximum temperature points that can be set from Home Assistant. Make sure that the Tuya Set Temperature in Tasmota is set above max_temp, otherwise this entity will not work correctly.
Target temp is the initial target temperature if one wasn’t previously set. Home Assistant will use its internal logic to control the heater to achieve the desired temperature and cannot use set temperature here.
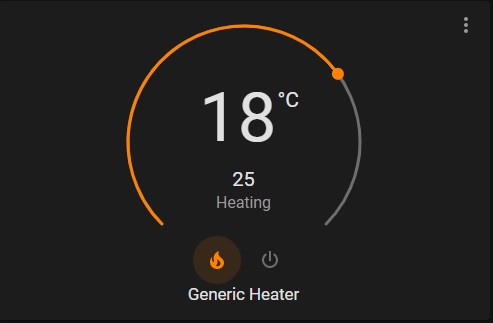
This new entity will not show up under the same Device Card or in Devices list. You can look for it in Development - States tab. In this example it was named climate.generic_heater from its name field.
See Home Assistant documentation for more options of the generic thermostat integration.
MQTT Climate Integration
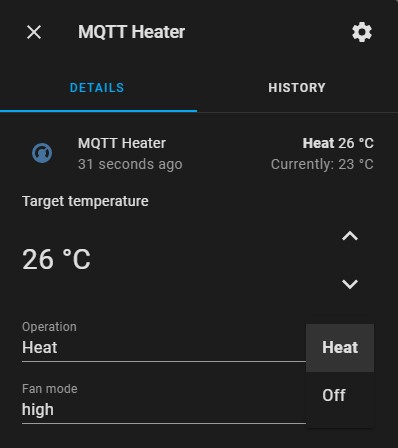
This option uses the MQTT HVAC integration and has more features including heat modes and setting target temperature in Tasmota or even swing door modes if such a Tuya heater exists. Due to that the setup is more advanced:
Change heater to your chosen topic, then to configuration.yaml:
- platform: mqtt
    name: "MQTT Heater"
    modes:
      - "heat"
      - "off"
    mode_command_topic: "cmnd/heater/POWER1"
    mode_command_template: "{{'1' if value == 'heat' else '0'}}"
    mode_state_topic: "tele/heater/STATE"
    mode_state_template: "{{'heat' if value_json.POWER1 == 'ON' else 'off'}}"
    current_temperature_topic: "tele/heater/SENSOR"
    current_temperature_template: "{{value_json['TuyaSNS']['Temperature']}}"
    temperature_state_topic: "tele/heater/SENSOR"
    temperature_state_template: "{{value_json['TuyaSNS']['TempSet']}}"
    min_temp: 18
    max_temp: 28
    precision: 1.0
    temperature_command_topic: "cmnd/heater/TUYASEND2"
    temperature_command_template: "2,{{value|int}}"
    fan_modes:
        - "low"
        - "high"
    fan_mode_state_topic: "stat/heater/RESULT"
    fan_mode_state_template: "{{'high' if value_json.TuyaEnum1 == 0 else 'low'}}"
    fan_mode_command_topic: "cmnd/heater/TuyaEnum1"
    fan_mode_command_template: "{{'1' if value == 'low' else '0'}}"
    availability_topic: tele/heater/LWT
    payload_available: Online
    payload_not_available: Offline
Power Modes
While the fields are called heater mode this is used only for basic power on or power off display and control.
    modes:
      - "heat"
      - "off"
Since we’re working with a general climate integration most of the allowed modes are intended for true HVAC systems. This will limit this entity to “heat” as on and “off” as, well, off!
    mode_command_topic: "cmnd/heater/Power1"
    mode_command_template: "{{'1' if value == 'heat' else '0'}}"
Set topic with which to control the heater. This might be POWER if there’s only one relay configured in TuyaMCU. To make sure this always works I recommend setting SetOption26 1 which makes POWER states always reported with numbers added.
The mode_command_template is necessary to convert Home Assistant entity states, which can be “heat” or “off” to Tasmota payloads. 1 (ON) is sent as a payload of the Power1 command when you change heater mode in HA to “heat”. In all other cases 0 (OFF) will be sent
    mode_state_topic: "tele/heater/STATE"
    mode_state_template: "{{'heat' if value_json.POWER1 == 'ON' else 'off'}}"
Sets the topic from which HA reads the current operating mode.
The mode_state_template takes the JSON payload from Tasmota for POWER1 and converts it to entity states. ON state is reported as “heat” and everything else as “off”.
Current Temperature
    current_temperature_topic: "tele/heater/SENSOR"
    current_temperature_template: "{{value_json['TuyaSNS']['Temperature']}}"
Read the TuyaMCU Temperature sensor from the JSON payload and uses its state to display current temperature for the entity.
tele/heater/SENSOR = {"Time":"2021-00-00T00:00:00","TuyaSNS":{"Temperature":24,"TempSet":26},"TempUnit":"C"}
Target Temperature
    temperature_state_topic: "tele/heater/SENSOR"
    temperature_state_template: "{{value_json['TuyaSNS']['TempSet']}}"
    min_temp: 18
    max_temp: 28
    precision: 1.0
Read the TuyaMCU Set Temperature sensor from the JSON payload and uses its state to display target temperature for the entity.
tele/heater/SENSOR = {"Time":"2021-00-00T00:00:00","TuyaSNS":{"Temperature":24,"TempSet":26},"TempUnit":"C"}
min_temp and max_temp set the minimum and maximum temperature points that can be selected for the entity.
precision matches our device temperature precision which is in increments of 1 degree.
    temperature_command_topic: "cmnd/heater/TuyaSend2"
    temperature_command_template: "2,"
To send the target temperature value to Tasmota use the TuyaSend2 command.
The template create a payload of 2, which is the dpId number for setting temperature on the example device. If your device uses a different dpId, change accordingly. Then it will insert the selected target temperature value in int format because TuyaMCU accepts only integers.
In Tasmota terms, it will issue a TuyaSend2 2,<x> command.
Heater Modes
While they’re called fan modes these fields will be used as heater modes.
This part will not work without a correctly set up Enum1
    fan_modes:
        - "low"
        - "high"
See supported fan modes. While my device has an off mode, it made no sense to have two off commands for the same device. If you change names of these modes you will have to edit below templates as well.
If you have more Enums configured in Tasmota, change TuyaEnum1 accordingly.
    fan_mode_state_topic: "stat/heater/RESULT"
    fan_mode_state_template: "{{'high' if value_json.TuyaEnum1 == 0 else 'low'}}"
Sets the topic from which HA reads the current fan mode out of a JSON payload such as stat/heater/RESULT = {"TuyaEnum1":0}
The fan_mode_state_template takes the JSON payload from Tasmota for TuyaEnum1 and converts it to entity states.
0 state is reported as “high” and everything else as “low”. Double check how your device reports states, in my case dpId4 = 0 is high and dpId4 = 1 is low.
    fan_mode_command_topic: "cmnd/heater/TuyaEnum1"
    fan_mode_command_template: "{{'1' if value == 'low' else '0'}}"
Changing heater modes is done using TuyaEnum1 command. The template converts HA states to proper payload for the command.
If mode is set to “low” the TuyaEnum1 1 command will be send, otherwise (usually when set to “high”) TuyaEnum1 0 is sent.
If you have swing mode on your device it can be handled in a similar way using an Enum and templating the mode conversion.
Availability
    availability_topic: tele/heater/LWT
    payload_available: Online
    payload_not_available: Offline
Just the standard availability topics. If these are not correct the device will always show as unavailable.
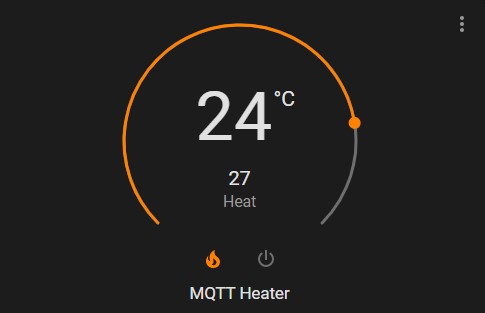
This new entity will not show up under the same Device Card or in Devices list. You can look for it in Development - States tab. In this example it was named climate.mqtt_heater from its name field.
See Home Assistant documentation for more options of the MQTT HVAC integration.

Explore more like this

Moes ES1 (ZSS-LP-HP02) Zigbee Human Presence Sensor Review
It was hard to resist the new Moes labelled sensor on AliExpress because it looked identical to the Linptech ES1 sensor which works with Xiaomi’s Mijia ecosystem but I avoided...

Comments