Custom Firmware for Sonoff SNZB-02 Zigbee Temperature and Humidity Sensor

Summary
Supercharge your Sonoff SNZB-02 Zigbee Temperature and Humidity Sensor with custom EFEKTA firmware from smartboxchannel.
Links in this article marked with a * are affiliate links. By purchasing through them I get a small commission that funds future projects!
I’ve reviewed Sonoff’s sensor in Battle of the Zigbees and I wasn’t impressed despite the low price. Neither was smartboxchannel of EfektaLab, a developer of DIY Zigbee devices, who made custom firmware for it.
This firmware supercharges the mediocre SNZB-02 wit new features. First and best improvement is a customisable report interval, default being 5 minutes and available range from 1 minute to 1 hour.
You get thresholds for too high or too low temperature and humidity alerts can make your own thermostat by binding to another Zigbee device. Finally you can set offsets to calibrate the readings.
smartboxchannel project GitHub has instructions for flashing using a TI CCDebugger (Amazon* or AliExpress*) but there’s a cheaper solution with a NodeMCU or D1 mini and a little program called CCLoader.
What You’ll Need
- Sonoff temperature and humidity sensor SNZB-02 - can’t do much without one
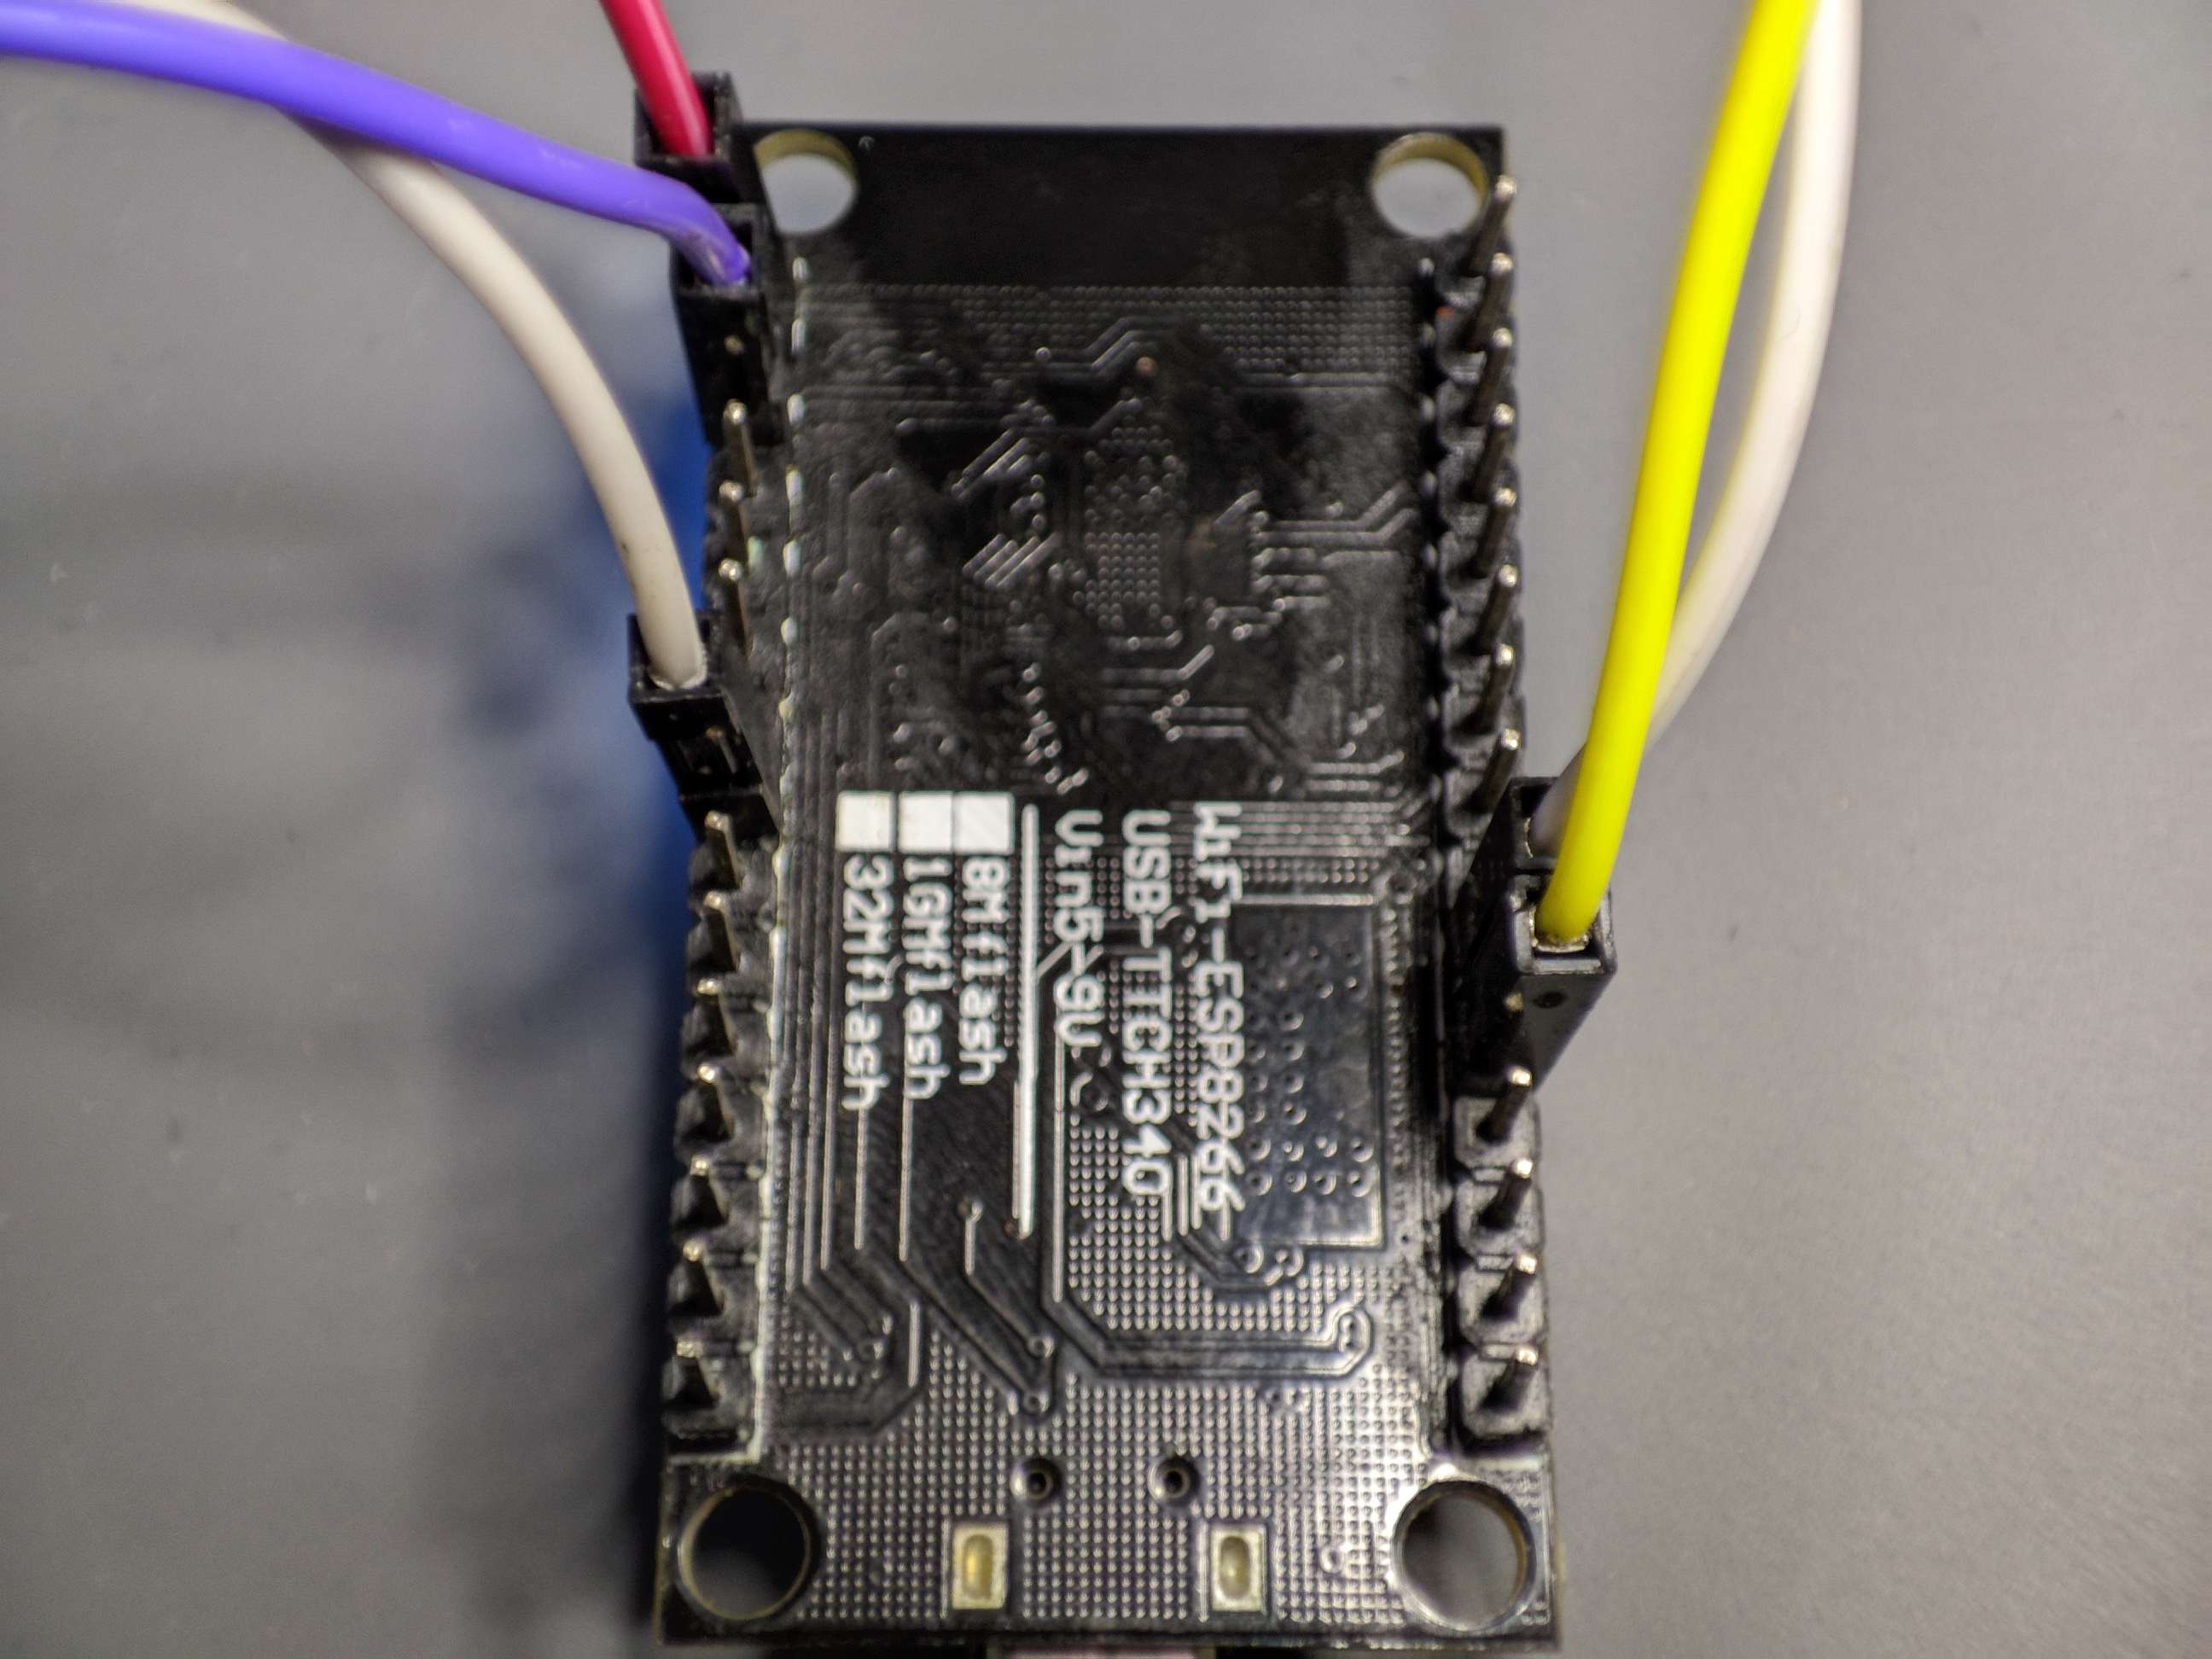
- an ESP8266 development board - a NodeMCU is best (Amazon*, AliExpress) but a D1 mini or any other board with a USB port will do the job
- a soldering iron - I recommend a modern pen style iron with TS or T12 tips such as Sequre Si012 (Banggood*, AliExpress*, Amazon*, Sequre*), PTS100 (Banggood*, AliExpress*) or Pinecil (Amazon*)
- Dupont or jumper wires - to connect the sensor with the ESP8266 board (AliExpress* or Amazon*)
- good solder and flux - don’t get the super cheap stuff and definitely don’t use unleaded solder. I typically get Mechanic brand from AliExpress* and also their RMA223 flux*.
Prepare Sonoff
Lift the back plate, remove the battery then pull out the plastic battery holder to extract the PCB.
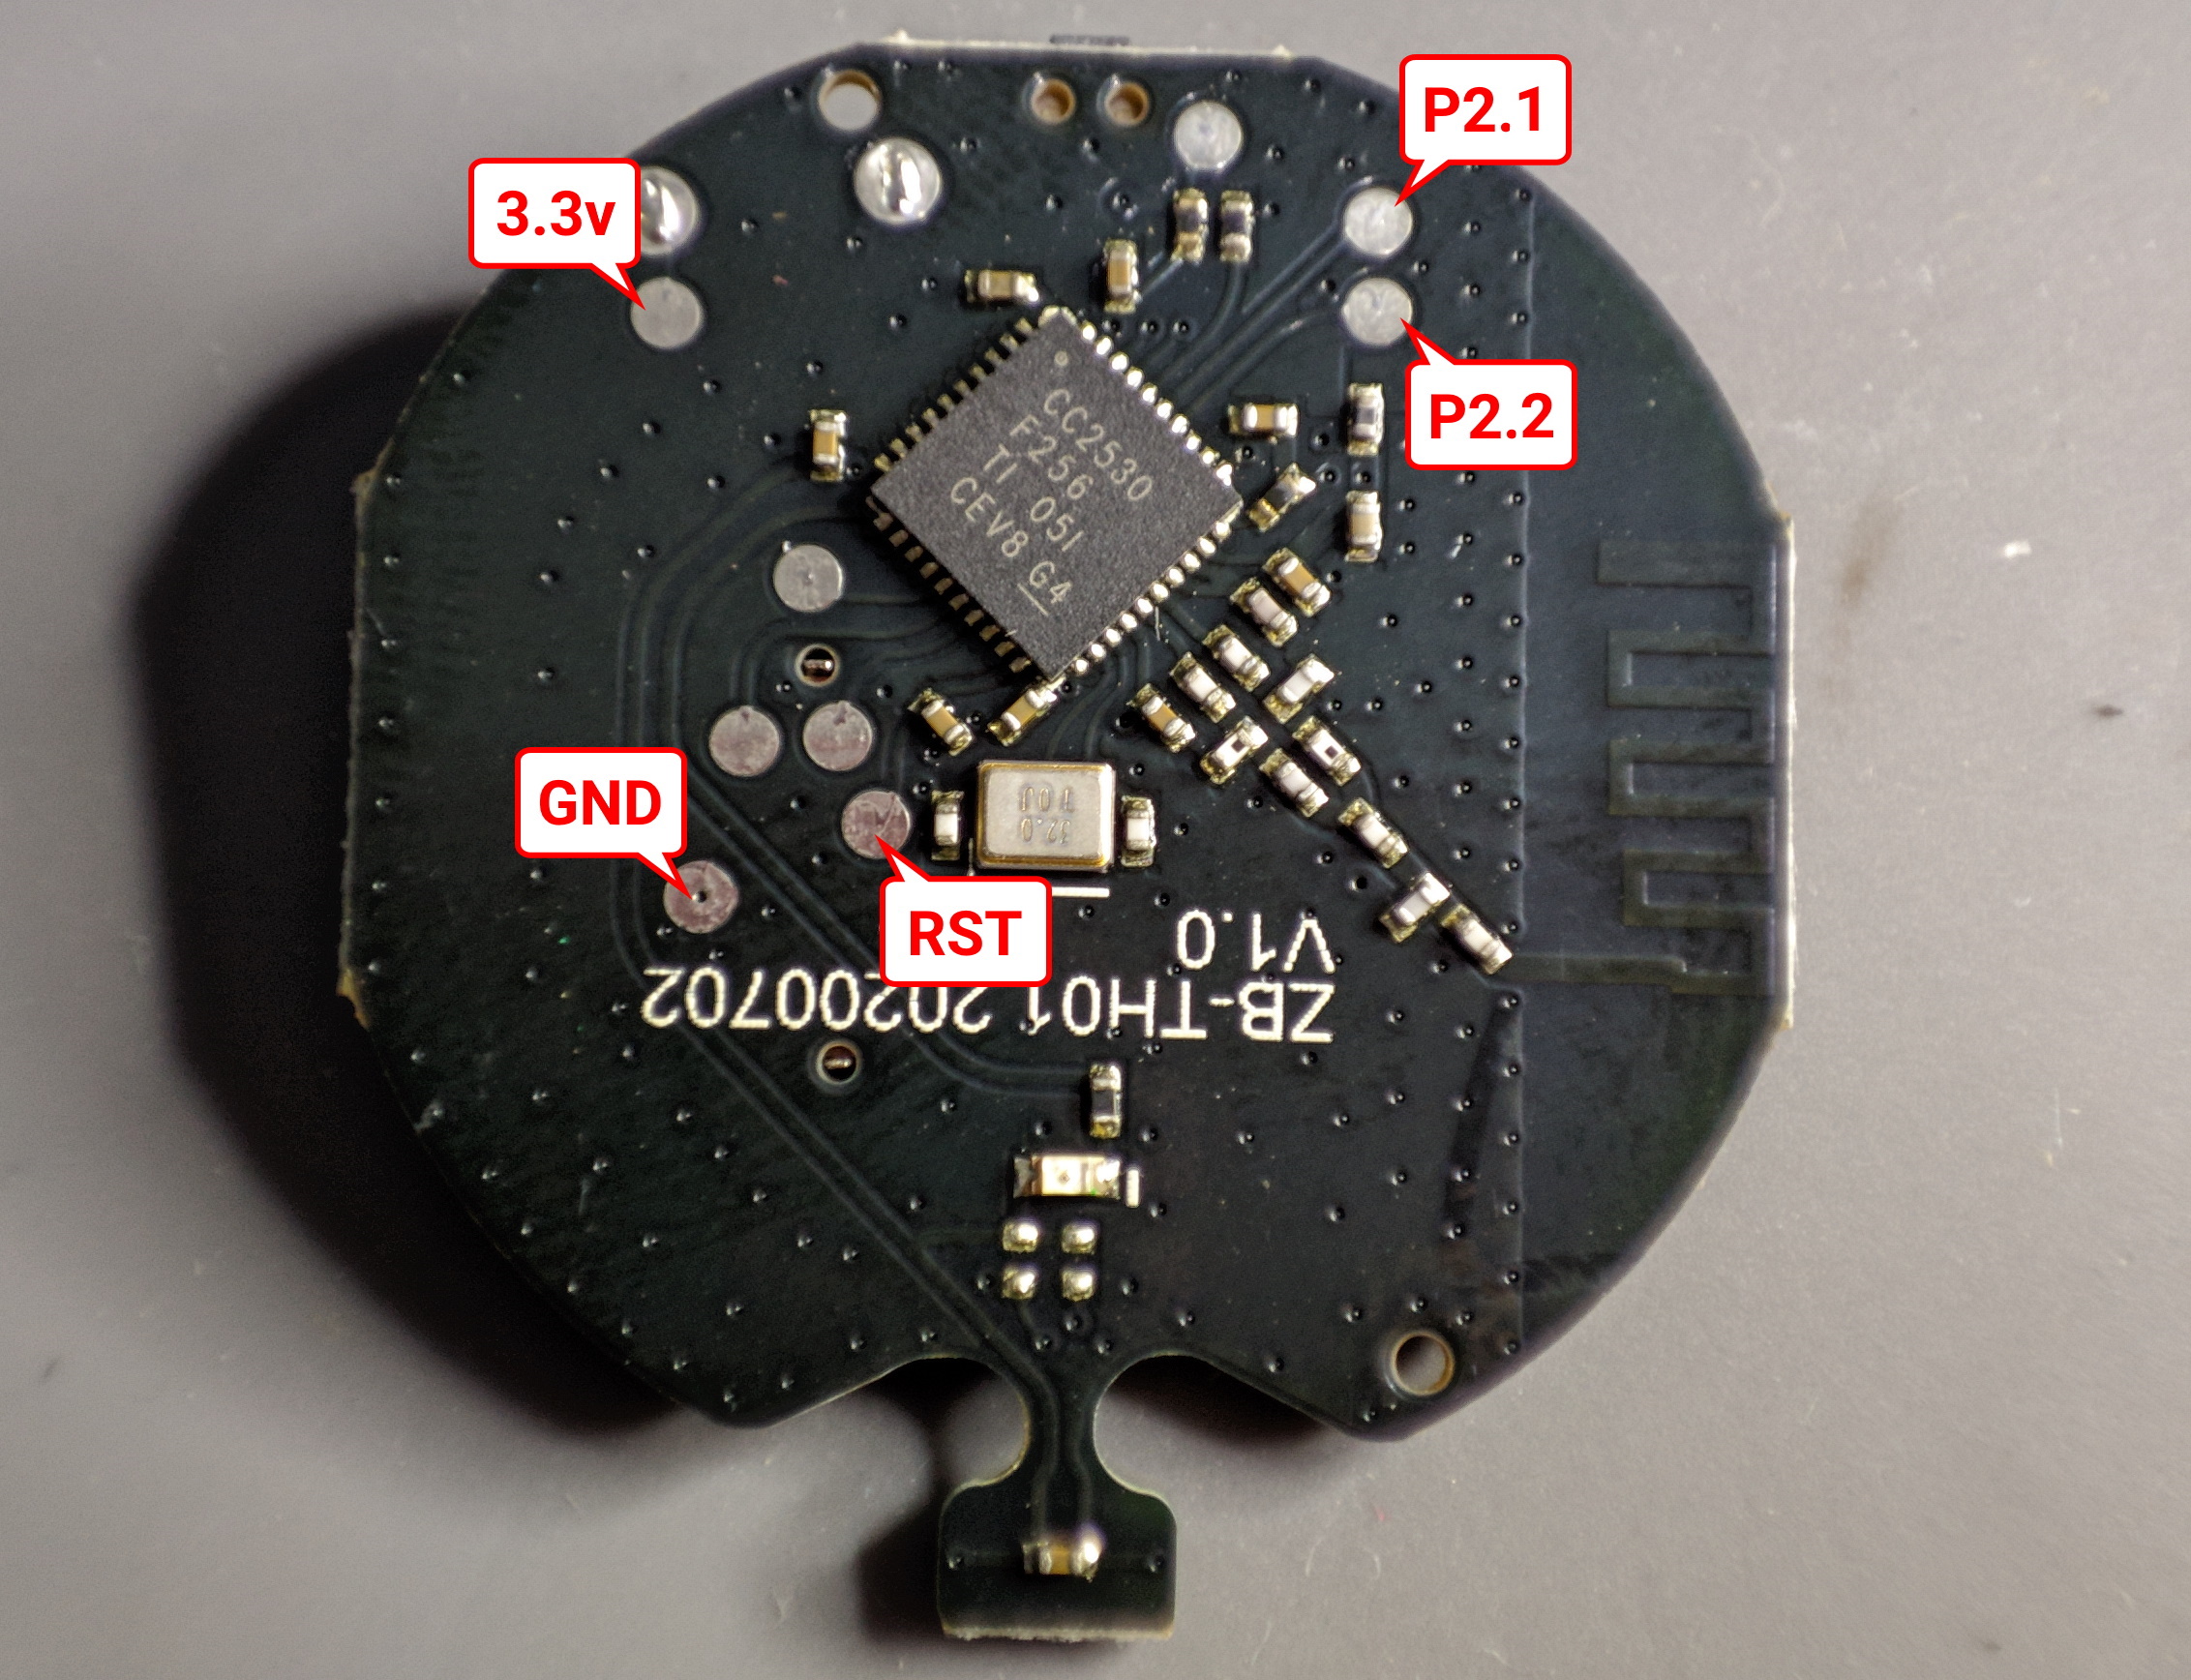
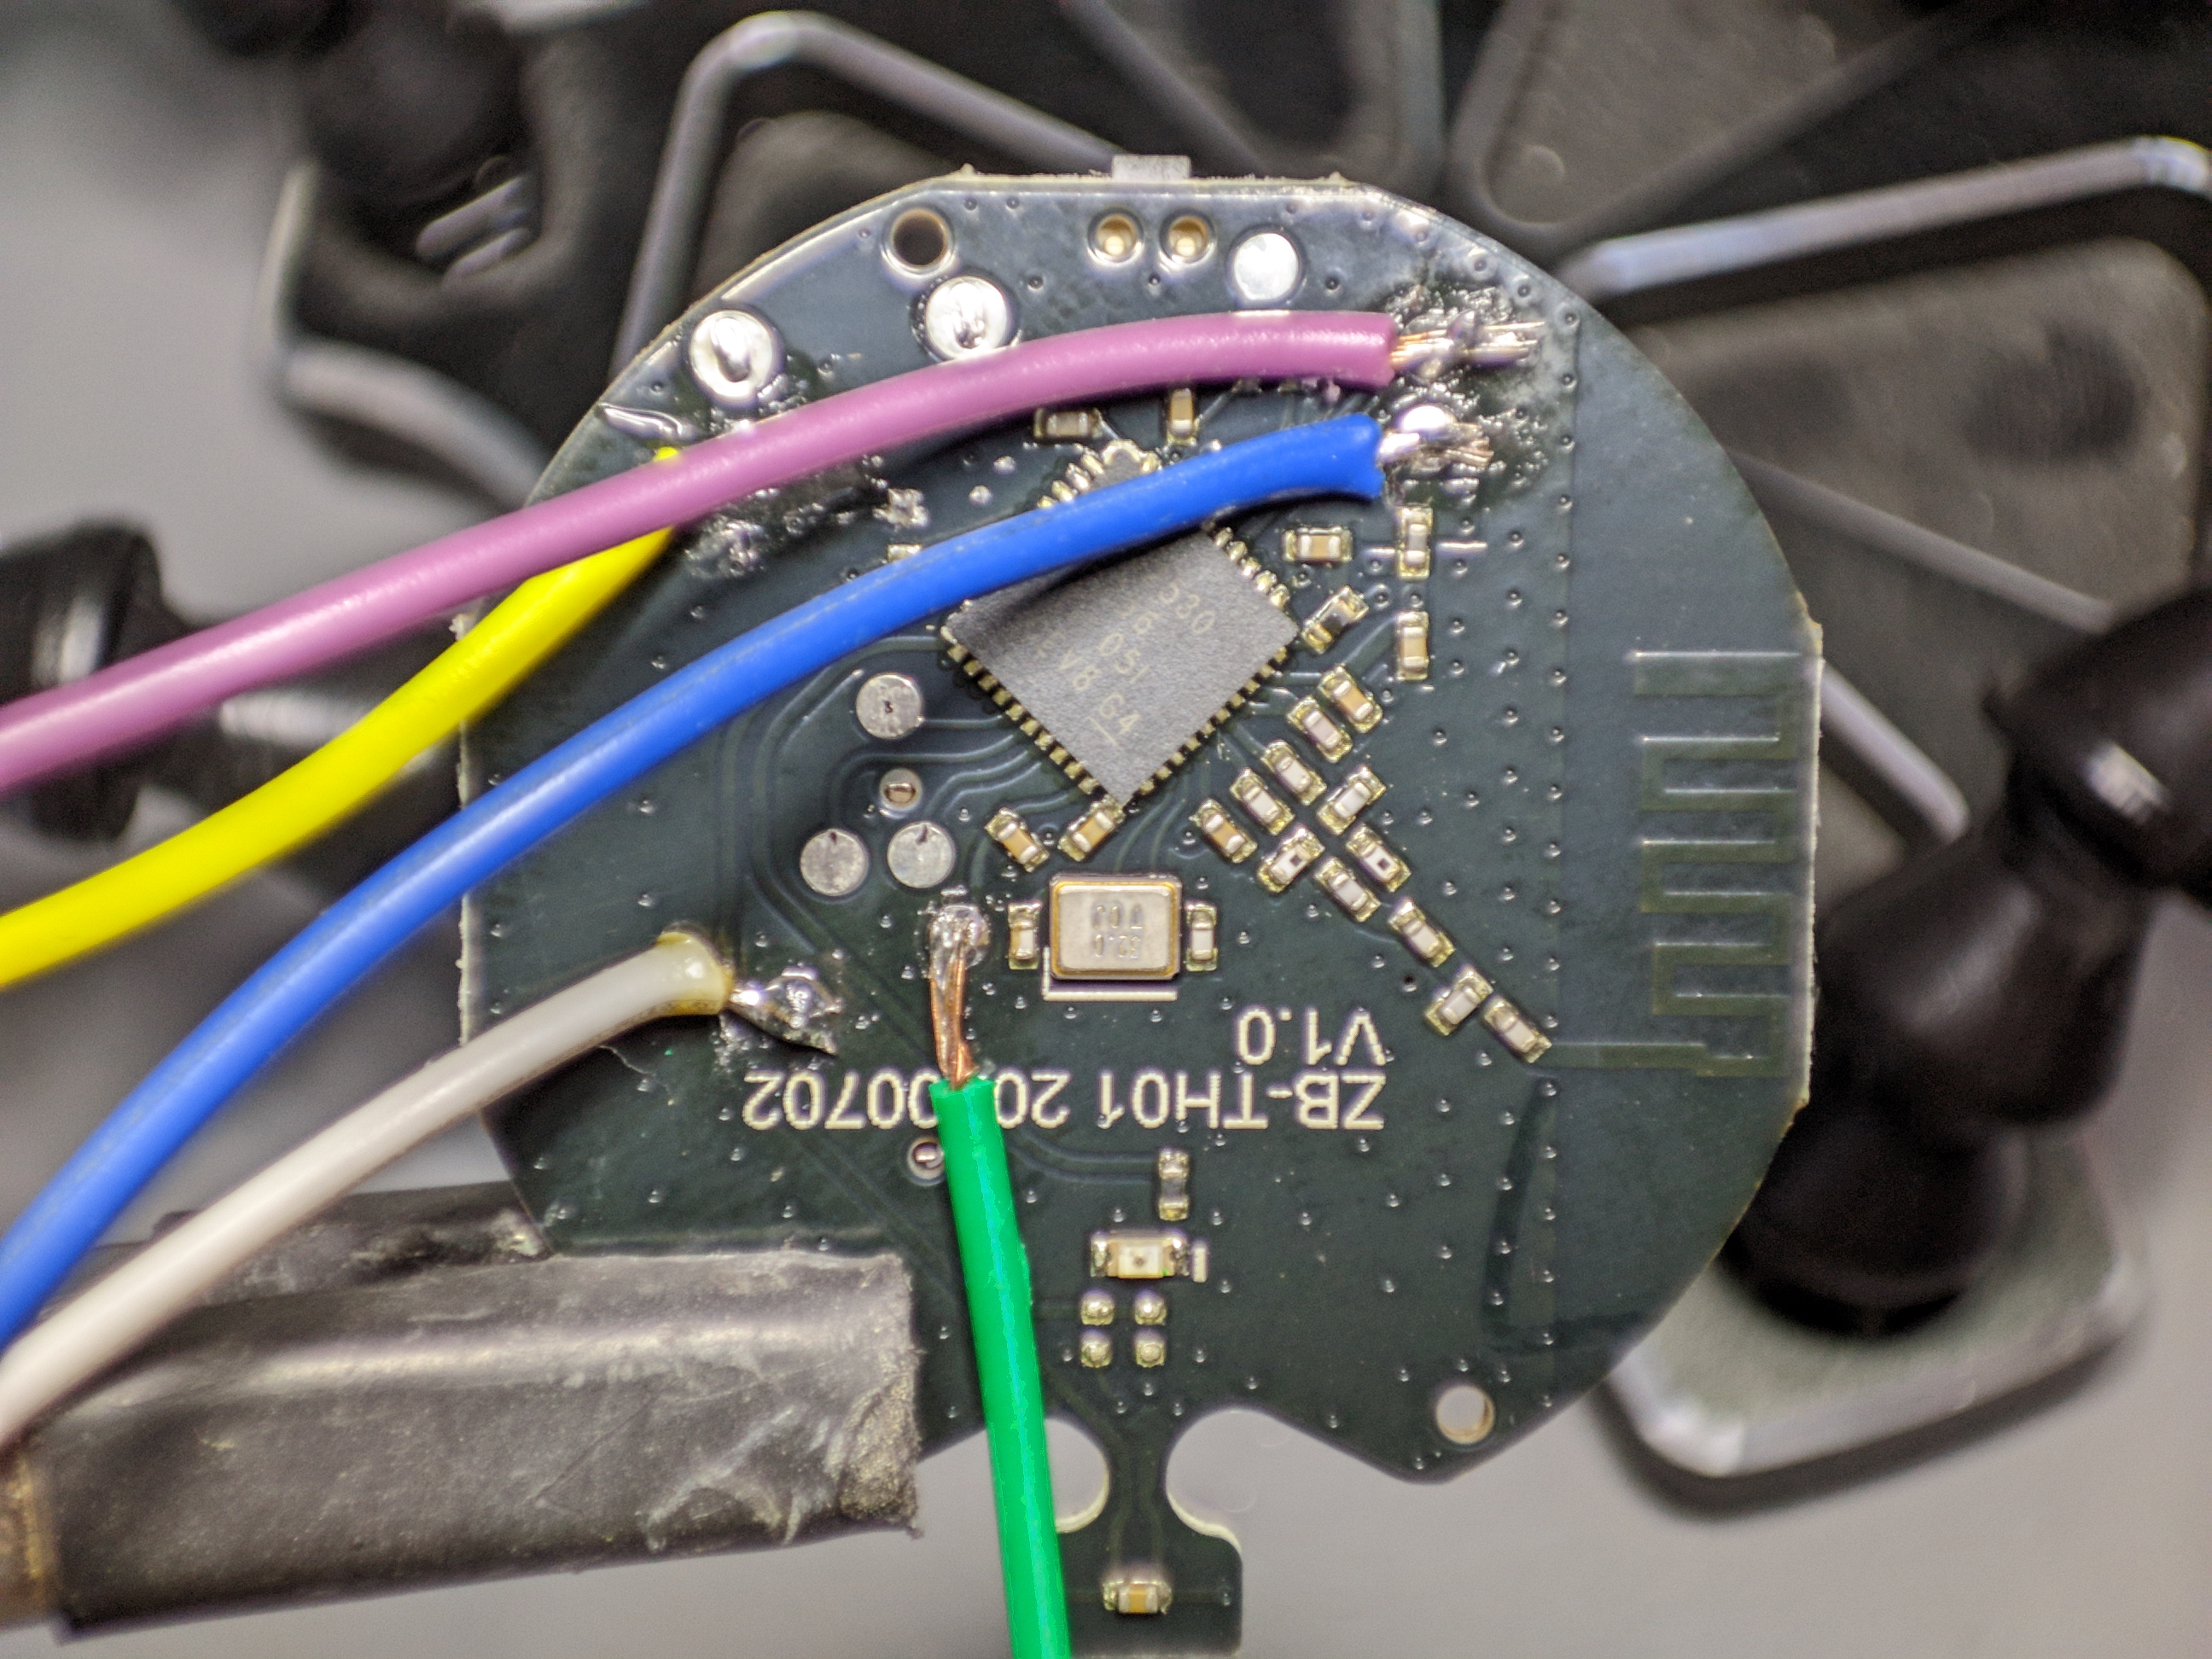
Put some solder on those pins and solder in the wires. When soldering take extra precaution to avoid solder bridging and shorts between wires. It doesn’t have to be pretty, you’ll remove the wires after it’s all done.
Prepare the ESP8266
Connect the board to your computer with a data USB cable and make sure it is recognised by the system. If not install the required drivers for your board.
Download the CCLoader fork by Jason2866 by clicking on Download ZIP and unpack to a folder.
Flash the ESP8266 (NodeMCU) with the precompiled CCLoader_Arduino.bin from Bin folder of the downloaded zip file using your favorite ESP8266 flashing tool such as: ESP Flasher, NodeMCU-pyflasher, esptool.py, etc
Connect ESP8266 to Sonoff
Using the pinout image connect the ESP8266 pins to Sonoff sensor pins according to the table.
| Sonoff | ESP8266 | GPIO# | ||
|---|---|---|---|---|
| P2.1 | D5 | GPIO14 | ||
| P2.2 | D2 | GPIO4 | ||
| RST | D1 | GPIO5 | ||
| 3.3V | 3.3V | 3.3V | ||
| GND | GND | GND |
Prepare Custom Firmware
Download custom EFEKTA firmware from GitHub. If the file opens as text, right click, Save as… and save as sonoff.hex.
Windows
Download objcopy.exe from SourceForge and extract. (If objcopy.exe fails to run you need to download libiconv and extract to same folder.)
Copy the firmware .hex file to the same folder and convert it to .bin with:
objcopy.exe --gap-fill 0xFF --pad-to 0x040000 -I ihex sonoff.hex -O binary sonoff.bin
Move the converted .bin to your CCLoader folder.
Linux
Install the binutils package using your package manager (Debian based: sudo apt install binutils)
Copy the firmware .hex file to the same folder and convert it to .bin with:
objcopy --gap-fill 0xFF --pad-to 0x040000 -I ihex sonoff.hex -O binary sonoff.bin
Flash Firmware
CCLoader will use the NodeMCU with the flashed CCLoader binary as a bridge to upload the firmware to the Sonoff sensor.
Windows
Use CCLoader_x86_64.exe or CCloader.exe from \Windows folder. Place the prepared .bin in the same folder as CCLoader executable.
Command to start the flashing process. Change COM# to the COM port number only to which your ESP8266 is connected.
CCLoader_x86_64.exe [COM#] sonoff.bin 0
Example: with NodeMCU on COM6
CCLoader_x86_64.exe 6 sonoff.bin 0
Linux
First you have to compile CCLoader:
cdtoCCLoader/SourceCode/Linux-
run
gcc main.c -o CCLoader
Place the prepared .bin in the same folder as the compiled CCLoader executable.
Command to start the flashing process
./CCLoader [port path] sonoff.bin 0
Example: with NodeMCU on /dev/ttyACM0
./CCLoader /dev/ttyACM0 sonoff.bin 0
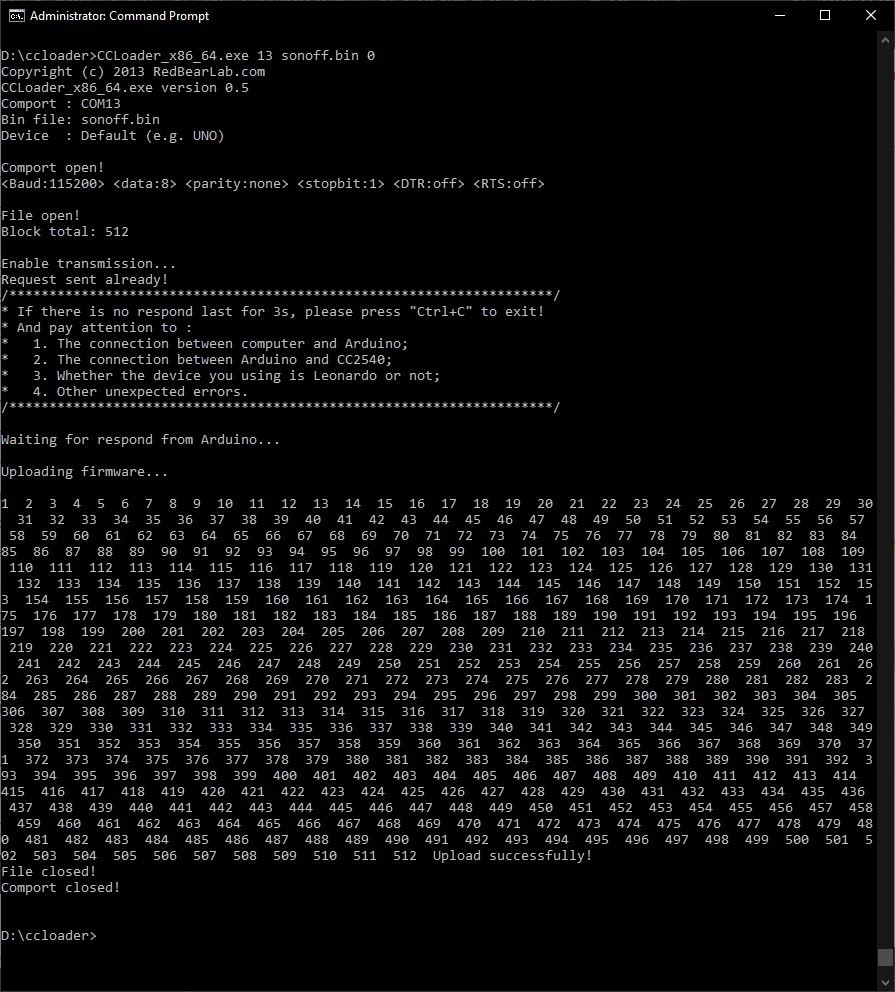
CCloader will start to count up, wait until the command prompt reappears. Firmware flash was successful if you see this:
Upload successfully!
File closed!
Comport closed!
Troubleshooting
If flashing fails or gets stuck at Request sent already! Waiting for respond...:
- try using
1instead of0in the last parameter - replug NodeMCU and try again
- double check your wiring
Pairing
After a completed flash you can leave the sensor PCB powered by the NodeMCU and check whether it pairs. Hold the pairing button for 2 to 3 seconds until the red light starts flashing to put the custom firmware in pairing mode.
Holding the reset button for 10 seconds will reset device to custom firmware defaults.
Features
It successfully paired with Zigbee2MQTT and ZHA but ZHA didn’t have all the features available in the device card.
2022-09-23 addendum by the firmware author
In my firmware, the sensor, in fact, turns into a thermostat and a hydrostat. I will describe how it works. After adding the sensor to the Zigbee network, it can be linked, for example, to a relay. After connecting to the relay on the settings page, you need to set the temperature and / or humidity thresholds and activate the control. The sensor will then send on and off commands directly to the appropriate relay. Since almost all relays are routers, in fact, this tandem can work even if the network is lost, even if you turn off the network coordinator or your HA goes down.
And since everything is now working on the correct clusters, now this sensor can be tied to other devices using temperature and humidity clusters.
Link to author’s guide.
That is very impressive!
Original Firmware
This is Zigbee2MQTT with default Sonoff firmware.

Zigbee2MQTT
There’s a cornucopia of new features when using Zigbee2MQTT.
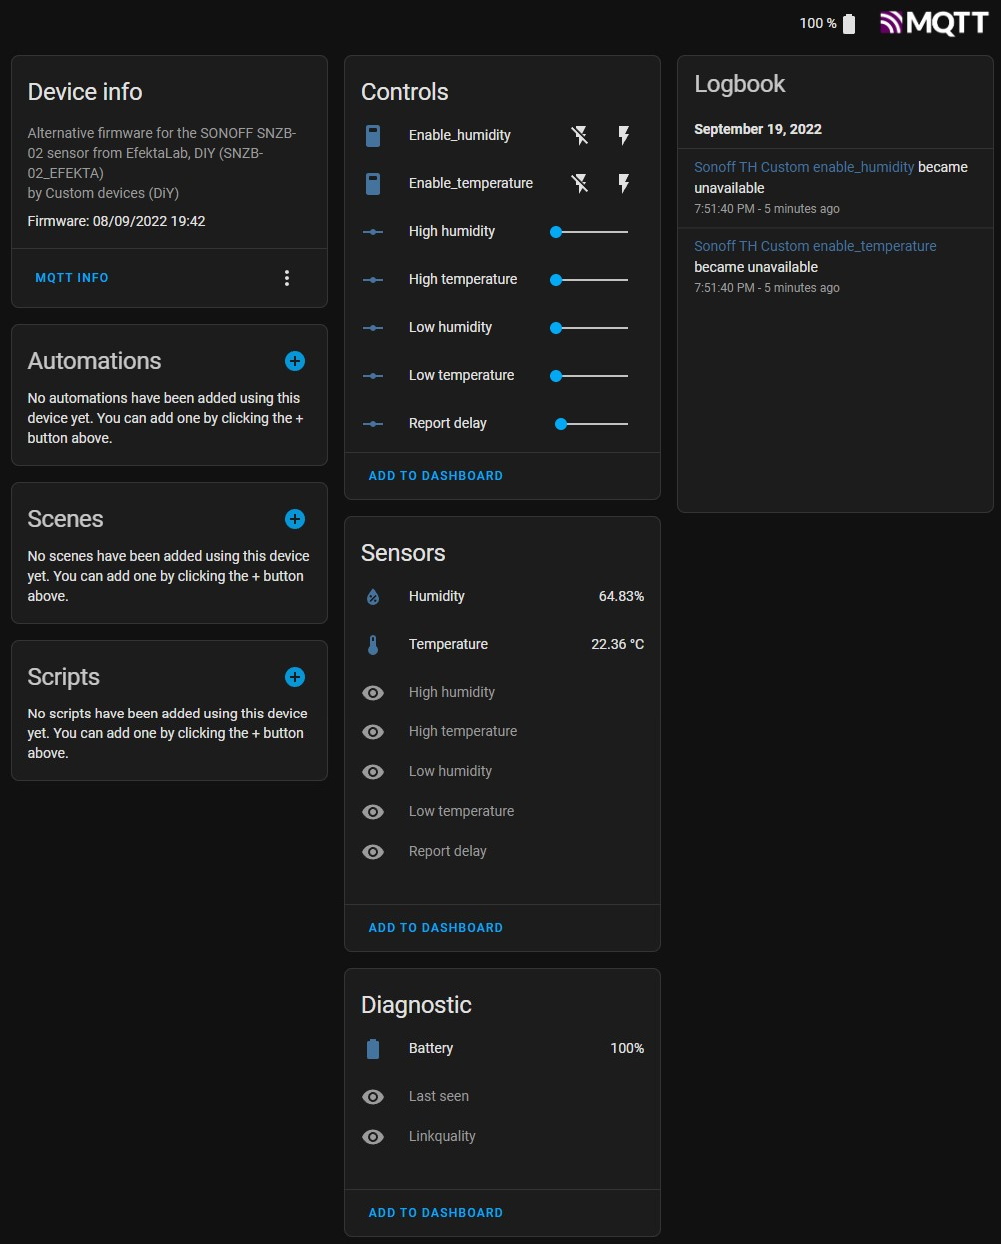
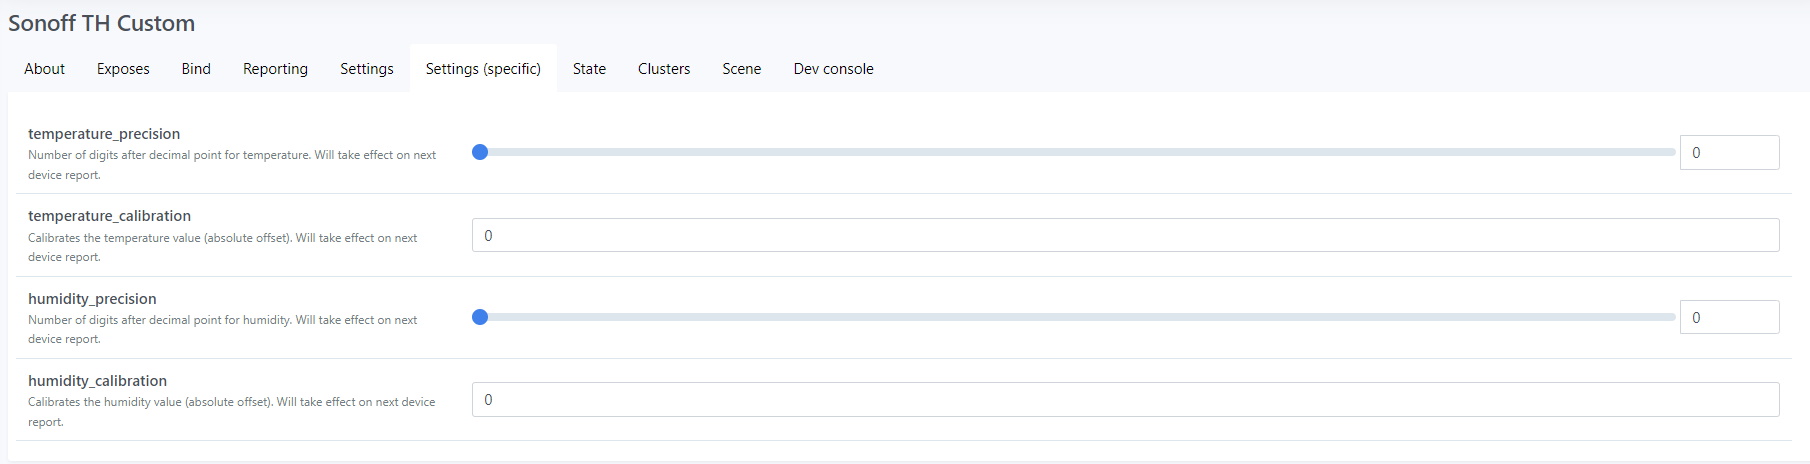
More settings can be found in Zigbee2MQTT frontend where you can set offsets for temperature and humidity readings and adjust reported value decimal point precision.
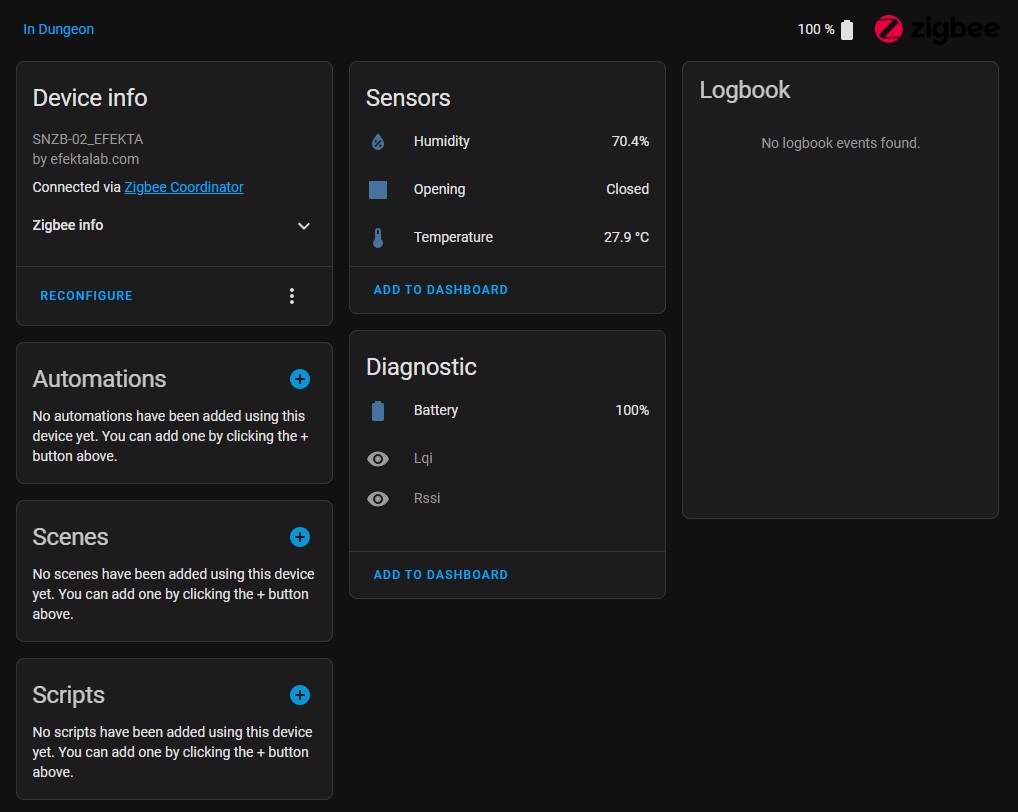
ZHA
The “Opening” entity is out of place and it definitely needs a quirk to add all the new features.

Explore more like this

Convert Xiaomi MMC MHO-C401 E-Ink Bluetooth Sensor to Zigbee
Guide on installing Zigbee firmware on the Bluetooth temperature and humidity sensor with e-ink display. The best Zigbee temperature and humidity sensor with an e-ink display is a Bluetooth one....

Moes ES1 (ZSS-LP-HP02) Zigbee Human Presence Sensor Review
It was hard to resist the new Moes labelled sensor on AliExpress because it looked identical to the Linptech ES1 sensor which works with Xiaomi’s Mijia ecosystem but I avoided...
Comments