Tuya Covers in Tasmota and Home Assistant
Summary
Configure Tuya based motors for covers (curtains, roller shades, blinds, …) in Tasmota and Home Assistant
Previously on the Zemismart ZM25TQ tasmotizing saga we got rid of the funky Realtek chip and installed a normal ESP8266 based module with Tasmota running on it perfectly. In this less-than-epic conclusion we will tackle device configuration in Tasmota and how to integrate it in Home Assistant.
Determining Functions
After Tasmota is properly configured and module is set to TuyaMCU (54) it is time to discover what each dpId does. First enable a more detailed webUI console log with Weblog 3. I always like to probe the MCU first with SerialSend5 55aa0001000000 which should return all possible dpId’s and their current statuses. In this case I got the following output:
00:00:10 CMD: weblog 3
00:00:10 MQT: stat/zm25tq/RESULT = {"WebLog":3}
00:00:14 CMD: SerialSend5 55aa0001000000
00:00:14 SRC: WebConsole from 10.1.1.60
00:00:14 CMD: Group 0, Index 5, Command "SERIALSEND", Data "55aa0001000000"
00:00:14 MQT: stat/zm25tq/RESULT = {"SerialSend":"Done"}
00:00:14 {"TuyaReceived":{"Data":"55AA0301002A7B2270223A224167764F6531783379656733666A646A222C2276223A22312E302E30222C226D223A307DB3","Cmnd":1,"CmndData":"7B2270223A224167764F6531783379656733666A646A222C2276223A22312E302E30222C226D223A307D"}}
00:00:14 TYA: MCU Product ID: {"p":"AgvOe1x3yeg3fjdj","v":"1.0.0","m":0}
00:00:14 TYA: Send "55aa0002000001"
00:00:14 {"TuyaReceived":{"Data":"55AA0302000004","Cmnd":2}}
00:00:14 TYA: RX MCU configuration Mode=0
00:00:14 TYA: Read MCU state
00:00:14 TYA: Send "55aa0008000007"
00:00:15 {"TuyaReceived":{"Data":"55AA03070005010400010216","Cmnd":7,"CmndData":"0104000102","DpType4Id1":2,"1":{"DpId":1,"DpIdType":4,"DpIdData":"02"}}}
00:00:15 TYA: fnId=0 is set for dpId=1
00:00:15 {"TuyaReceived":{"Data":"55AA03070008020200040000000019","Cmnd":7,"CmndData":"0202000400000000","DpType2Id2":0,"2":{"DpId":2,"DpIdType":2,"DpIdData":"00000000"}}}
00:00:15 TYA: fnId=0 is set for dpId=2
00:00:15 {"TuyaReceived":{"Data":"55AA0307000803020004000000001A","Cmnd":7,"CmndData":"0302000400000000","DpType2Id3":0,"3":{"DpId":3,"DpIdType":2,"DpIdData":"00000000"}}}
00:00:15 TYA: fnId=0 is set for dpId=3
00:00:15 {"TuyaReceived":{"Data":"55AA03070005050100010116","Cmnd":7,"CmndData":"0501000101","DpType1Id5":1,"5":{"DpId":5,"DpIdType":1,"DpIdData":"01"}}}
00:00:15 TYA: fnId=0 is set for dpId=5
00:00:15 {"TuyaReceived":{"Data":"55AA0307000507040001011B","Cmnd":7,"CmndData":"0704000101","DpType4Id7":1,"7":{"DpId":7,"DpIdType":4,"DpIdData":"01"}}}
00:00:15 TYA: fnId=11 is set for dpId=7
00:00:15 {"TuyaReceived":{"Data":"55AA030700050A050001001E","Cmnd":7,"CmndData":"0A05000100","DpType5Id10":"0x00","10":{"DpId":10,"DpIdType":5,"DpIdData":"00"}}}
00:00:15 TYA: fnId=0 is set for dpId=10
That’s a lot of dpId’s! Apart from playing with the device and discovering what each does there are a few shortcuts to find out their functions
Many previously discovered functions are listed in dpID Function Tables in Tasmota documentation.
Register for an account at https://iot.tuya.com where you can build your own Tuya device. During the build process it will show you default dpId’s used for all functions available for that device type. After creating my own Curtain Motor I could confirm all of the findings.
If you want to do it the hard way, or if you have no choice jump to Discovering dpId functions.
Tasmota Setup
First of all, you will not need shutter support in Tasmota. All the calculations and shutter positions are done by the MCU, all Tasmota has to do is send proper commands to the MCU.
We know dpId 1 controls the blinds but uses 0/1/2 payloads. That means we cannot assign it as an on/off relay unless we only want open and stop functionality. Since TuyaMCU maps dpId 1 as Power1 by default we need to move it to either a non-existing dpId or a report only dpId. I chose to move it to dpId 7 with TuyaMCU 11,7. This way it will turn on or off when the remote is used.
To control the blinds from Tasmota webUI we will map dpId 2 as a dimmer with TuyaMCU 21,2 and control them with the dimmer slider or using Dimmer commands. This is not a perfect solution but it will have to do. To have linear control use command LedTable 0. Use SetOption77 1 to stop dimmer slider from changing power state.
To fix the issue of the slider not updating because a different dpId shows the position status and not dpId 2 we need a rule that watches dimmer status dpId 3 and forwards them to Dimmer command.
Rule1 ON TuyaReceived#DpType2Id3 DO Dimmer %value% ENDON
This setup might create some minor shade movement on reboot or certain value dimmer commands due to the difference in how the MCU calculates position value!
Home Assistant Configuration
Before configuring covers you need to set the motor direction (dpId 5) so that its position is 0 when fully open or rolled up and 100 when closed or rolled down. Take note which dpId 1 value opens and which one closes the shades. If yours is different change payload_open and payload_close fields accordingly.
In my examples the motor is installed on the left side and dpId 5 is set to 1 so when the motor spins towards the window shades are lowered and when it spins away from the window the shades are raised. If you have a different orientation you might need to play with position values.
Using Rules
I found this approach working correctly all the time without requiring fixes in HA. It works without any TuyaMCU mapping in Tasmota. All you need is to set rules in Tasmota to send needed dpId values to custom topics:
Rule
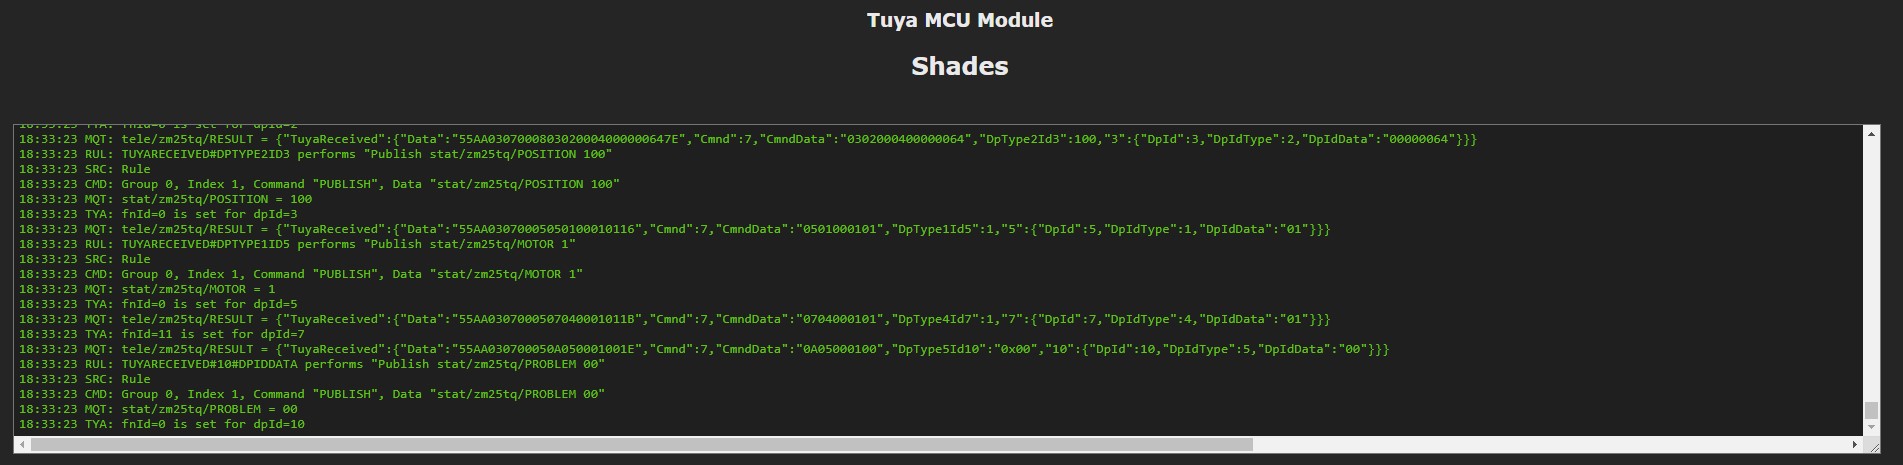
ON TuyaReceived#DpType2Id3 DO Publish stat/%topic%/POSITION %value% ENDON
ON TuyaReceived#10#DpIdData DO Publish stat/%topic%/PROBLEM %value% ENDON
ON TuyaReceived#DpType1Id5 DO Publish stat/%topic%/MOTOR %value% ENDON
First rule is for the position value, you need that one. Second is used for the Motor Error binary sensor. Third rule is used for the Motor Direction switch. You can omit those lines if you’re not using them.
Enable the rule with Rule 1
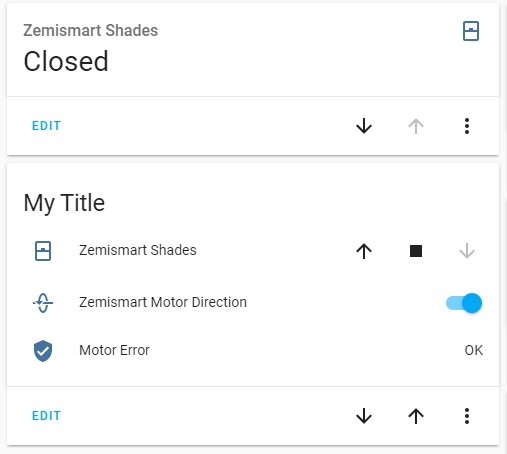
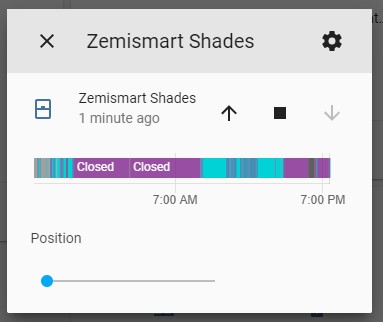
Cover
cover:
  - platform: mqtt
    # requires dpid5 = 1
    name: "Shades"
    device_class: shade
    command_topic: "cmnd/zm25tq/TuyaSend4"
    payload_open: "1,0"
    payload_close: "1,2"
    payload_stop: "1,1"
    position_open: 0
    position_closed: 100
    position_topic: "stat/zm25tq/POSITION"
    position_template: '{{ value_json }}'
    set_position_topic: "cmnd/zm25tq/TuyaSend2"
    set_position_template: '2,{{ 100 - position }}'
    availability_topic: "tele/zm25tq/LWT"
    payload_available: "Online"
    payload_not_available: "Offline"
Motor Error Sensor
Binary sensor for motor errors. If the value isn’t 00 the sensor will trigger.
binary_sensor:
  - platform: mqtt
    name: "Motor Error"
    state_topic: "stat/zm25tq/PROBLEM"
    device_class: problem
    value_template: >-
        {% if value_json is defined and value_json != 00 %}
        ON
        {% else %}
        OFF
        {% endif %}
Motor Direction Switch
switch:
  - platform: mqtt
    name: "Motor Direction"
    icon: mdi:blinds
    state_topic: "stat/zm25tq/MOTOR"
    state_on: 1
    state_off: 0
    command_topic: "cmnd/zm25tq/TuyaSend"
    payload_on: "5,1"
    payload_off: "5,0"
    availability_topic: "tele/zm25tq/LWT"
    payload_available: "Online"
    payload_not_available: "Offline"
Using TuyaReceived
This configuration relies only on TuyaReceived MQTT messages. For that we need to enable sending TuyaReceived over MQTT with SetOption66 1. It works without any TuyaMCU mapping in Tasmota.
Cover
There is some weirdness with HA’s current_position attribute where the state would flip between open and closed when its position was at 100 so there’s a fix where that position is subtracted from 100
cover:
  - platform: mqtt
    # requires SetOption66 1
    name: "Shades"
    device_class: shade
    command_topic: "cmnd/zm25tq/TuyaSend4"
    payload_open: "1,0"
    payload_close: "1,2"
    payload_stop: "1,1"
    position_open: 0
    position_closed: 100
    position_topic: "tele/zm25tq/RESULT"
    position_template: >-
        {% if value_json['TuyaReceived']['DpType2Id3'] is undefined %}
        {{ 100 - state_attr('cover.shades','current_position') | int }}
        {% else %}
        {{ value_json['TuyaReceived']['DpType2Id3'] | int }}
        {% endif %}
    set_position_topic: "cmnd/zm25tq/TuyaSend2"
    set_position_template: "2,{{ position }}"
    availability_topic: "tele/zm25tq/LWT"
    payload_available: "Online"
    payload_not_available: "Offline"
Motor Error Sensor
binary_sensor:
- platform: mqtt
  name: "Motor Error"
  state_topic: "tele/zm25tq/RESULT"
  device_class: problem
  value_template: >-
      {% if value_json.TuyaReceived.DpType5Id10 is defined %}
        {% if value_json.TuyaReceived.DpType5Id10  == '0x00' %}
        OFF
        {% else %}
        ON
        {% endif %}
      {% else %}
      OFF
      {% endif %}
Motor Direction Switch
switch:
- platform: mqtt
  name: "Motor Direction"
  icon: mdi:blinds
  state_topic: "tele/zm25tq/RESULT"
  state_on: 1
  state_off: 0
  value_template: >-
      {% if value_json['TuyaReceived'].DpType1Id5 is defined %}
      {{ value_json.TuyaReceived.DpType1Id5 }}
      {% else %}
      {{ states('switch.motor_direction') }}
      {% endif %}
  command_topic: "cmnd/zm25tq/TuyaSend"
  payload_on: "5,1"
  payload_off: "5,0"
  availability_topic: "tele/zm25tq/LWT"
  payload_available: "Online"
  payload_not_available: "Offline"
Using Dimmer
If you have set up shades as a dimmer in Tasmota you can use this configuration. Requires TuyaMCU 21,2 and enabled SetOption59 1.
cover:
  - platform: mqtt
    # requires SetOption59 1, TuyaMCU 21,2
    name: "Shades"
    device_class: shade
    command_topic: "cmnd/zm25tq/TuyaSend4"
    payload_open: "1,0"
    payload_close: "1,2"
    payload_stop: "1,1"
    position_open: 0
    position_closed: 100
    position_topic: "tele/zm25tq/STATE"
    position_template: '{{ value_json.Dimmer }}'
    set_position_topic: "cmnd/zm25tq/Dimmer"
    set_position_template: '{{ 100 - position | int }}'
    availability_topic: "tele/zm25tq/LWT"
    payload_available: "Online"
    payload_not_available: "Offline"
Configure Motor Error and Motor Direction using one of the examples above.
Sync states on Home Assistant restart
To always have current state in HA you need to create an automation, first action will sync all Tasmota devices and second one is directed only at the motor. It will list all dpId states whenever HA is restarted which will trigger all the defined rules and update values.
automations.yaml
- id: 359be2dd845b3892c30e
  alias: sync tasmota state
  initial_state: true
  trigger:
    platform: homeassistant
    event: start
  action:
  - service: mqtt.publish
    data:
      topic: cmnd/tasmotas/state
      payload: ''
  - service: mqtt.publish
    data:
      topic: cmnd/zm25tq/serialsend5
      payload: 55aa0001000000
Bonus: Motor direction with status icons
If you want the motor direction switch to display current direction in an icon add this to the existing mqtt.switch configuration.
switch:
  - platform: template
    switches:
      shades_motor_direction:
        value_template: "{{ is_state('switch.motor_direction', 'on') }}"
        turn_on:
          service: switch.turn_on
          data:
            entity_id: switch.motor_direction
        turn_off:
          service: switch.turn_off
          data:
            entity_id: switch.motor_direction
        icon_template: >-
            {% if is_state('switch.motor_direction', 'on') %}
              mdi:horizontal-rotate-counterclockwise
            {% else %}
              mdi:horizontal-rotate-clockwise
            {% endif %}
Final configuration
Discovering dpId functions
First you need to know some rules: DpIdType
dpId 1
I started with dpID1 which accepts enum (predefined set of values such as 0/1/2/3 ) commands using TuyaSend4. First I tried TuyaSend4 1,0 which started opening the shades. TuyaSend4 1,1 stopped them and TuyaSend4 1,2 started closing them. Next I used TuyaSend4 1,3 which didn’t do anything.
Now we know dpId 1 is for open/close/stop control.
dpId 2 and 3
While playing with dpId 1 there was output on TuyaReceived on dpId 3 whenever the shades stopped moving:
15:47:31 {"TuyaReceived":{"Data":"55AA0307000803020004000000647E","Cmnd":7,"CmndData":"0302000400000064","DpType2Id3":100,"3":{"DpId":3,"DpIdType":2,"DpIdData":"00000064"}}}
15:47:31 TYA: fnId=0 is set for dpId=3
15:47:33 TYA: Send "55aa00000000ff"
15:47:33 {"TuyaReceived":{"Data":"55AA030000010104","Cmnd":0,"CmndData":"01"}}
This means dpId 3 is the position of the shades. That is further confirmed by seeing “DpType2Id3”:100 when the shades are fully down and “DpType2Id3”:0 when fully up. I tried setting the position with TuyaSend2 3,25 but nothing happened, meaning that dpId 3 is report only position status. After consulting the SerialSend5 output again we can see that dpId 2 and 3 look very similar with identical dpIdData values. When sending position command to dpId 2 with TuyaSend2 2,25 there’s immediate response from dpId 2
15:54:25 {"TuyaReceived":{"Data":"55AA03070008020200040000001932","Cmnd":7,"CmndData":"0202000400000019","DpType2Id2":25,"2":{"DpId":2,"DpIdType":2,"DpIdData":"00000019"}}}
15:54:25 TYA: fnId=0 is set for dpId=2
and once it reached the inputted position a response from dpId 3:
15:54:42 {"TuyaReceived":{"Data":"55AA0307000803020004000000142E","Cmnd":7,"CmndData":"0302000400000014","DpType2Id3":20,"3":{"DpId":3,"DpIdType":2,"DpIdData":"00000014"}}}
15:54:42 TYA: fnId=0 is set for dpId=3
dpId 5
Next is dpId 5 which should be pretty simple to discover. DpIdType 1 means it has binary (0 or 1) values. TuyaSend 5,0 gives a response but nothing happens, same as TuyaSend 5,1. Later on, after playing with it a bit more while using the remote I found out it changes motor’s spin direction.
dpId 7
Another Type4 (enum) dpId which didn’t appear once in the console after the first SerialSend command. TuyaSend4 7,0 through TuyaSend4 7,3 yielded no response so we again assume its a report only status but we don’t know when its used.
dpId 10
As a Type 5 status we know for sure its an error reporting dpID from the TuyaMCU article in Tasmota docs. Since the shown value is 0x00 we can assume it means OK and any other code will signify an error
Finding the remaining dpID’s
Since we still don’t know what dpId 5 and 7 do let’s grab the remote and see if there’s more output. Pressing up button on the remote immediately shows dpID 7 output
16:12:02 {"TuyaReceived":{"Data":"55AA0307000507040001001A","Cmnd":7,"CmndData":"0704000100","DpType4Id7":0,"7":{"DpId":7,"DpIdType":4,"DpIdData":"00"}}}
16:12:02 TYA:  fnId=0 is set for dpId=7
16:12:02 {"TuyaReceived":{"Data":"55AA0307000507040001001A","Cmnd":7,"CmndData":"0704000100","DpType4Id7":0,"7":{"DpId":7,"DpIdType":4,"DpIdData":"00"}}}
16:12:02 TYA:  fnId=0 is set for dpId=7
16:12:03 {"TuyaReceived":{"Data":"55AA0307000507040001001A","Cmnd":7,"CmndData":"0704000100","DpType4Id7":0,"7":{"DpId":7,"DpIdType":4,"DpIdData":"00"}}}
16:12:03 TYA:  fnId=0 is set for dpId=7
and down button
16:13:18 {"TuyaReceived":{"Data":"55AA0307000507040001001A","Cmnd":7,"CmndData":"0704000100","DpType4Id7":0,"7":{"DpId":7,"DpIdType":4,"DpIdData":"00"}}}
16:13:18 TYA:  fnId=0 is set for dpId=7
16:13:18 {"TuyaReceived":{"Data":"55AA0307000507040001011B","Cmnd":7,"CmndData":"0704000101","DpType4Id7":1,"7":{"DpId":7,"DpIdType":4,"DpIdData":"01"}}}
16:13:18 TYA:  fnId=0 is set for dpId=7
16:13:18 {"TuyaReceived":{"Data":"55AA0307000507040001011B","Cmnd":7,"CmndData":"0704000101","DpType4Id7":1,"7":{"DpId":7,"DpIdType":4,"DpIdData":"01"}}}
16:13:18 TYA:  fnId=0 is set for dpId=7
16:13:18 {"TuyaReceived":{"Data":"55AA0307000507040001011B","Cmnd":7,"CmndData":"0704000101","DpType4Id7":1,"7":{"DpId":7,"DpIdType":4,"DpIdData":"01"}}}
dpId 7 changes depending on whether the shades are opening or closing but it seems it only appears when the remote is used.
Curiously the up button now lowers the shades and down button raised them which was not the case before so it somehow changed. Since we still have dpID 5 as unknown and was changed from 0 to 1 while testing I changed it back to 0 with TuyaSend 5,0 and tried the remote again. It works as expected and now we know dpId 5 changes the motor’s spin direction.

Explore more like this

Moes ES1 (ZSS-LP-HP02) Zigbee Human Presence Sensor Review
It was hard to resist the new Moes labelled sensor on AliExpress because it looked identical to the Linptech ES1 sensor which works with Xiaomi’s Mijia ecosystem but I avoided...
Comments